3D Foamy Airplane Plans: Build Your Own RC Plane Easily
Building and flying 3D foamy airplanes is a thrilling hobby that combines engineering, creativity, and hands-on fun. These aircraft are made from lightweight foam and are specially designed for 3D aerobatics—manoeuvres that push the limits of flight. For beginners and experienced pilots alike, designing and building your own foamy airplane offers a sense of achievement and deep understanding of RC flight. Whether you dream of wild stunts or smooth park flying, a good set of 3D foamy airplane plans is the foundation for success.
This guide explores the world of 3D foamy airplanes, from understanding their unique design, choosing the right materials, to interpreting plans and building your own. Along the way, you’ll discover non-obvious tips, practical advice, and expert insights to help your foamy take to the skies with confidence.
What Makes A 3d Foamy Airplane Special?
3D foamy airplanes are engineered for extreme aerobatics—loops, rolls, hovers, and even flying backward. Unlike traditional RC planes, these models have:
- Lightweight frames for slow, precise movement
- Large control surfaces for quick response
- Powerful motors for vertical climbs and hovering
These features allow pilots to perform complex tricks in tight spaces, making them perfect for parks, gyms, or even large backyards.
Key Design Elements
- Flat or Profile Fuselage: Most 3D foamies use a simple, flat body. This reduces weight and makes assembly easier.
- Oversized Control Surfaces: The rudder, elevator, and ailerons are much larger than on a scale model. This increases the airplane’s agility.
- Reinforced Foam: Carbon fiber rods or strips are often embedded to prevent bending or twisting during aggressive maneuvers.
- High Thrust-to-Weight Ratio: These planes use powerful brushless motors and large propellers, so they can hang on the propeller (hover) and recover quickly from mistakes.
Why Build A 3d Foamy Airplane?
Building a 3D foamy airplane from plans is more than just a way to save money. It’s a chance to:
- Customize your design and performance
- Understand flight mechanics by hands-on construction
- Repair or modify easily after crashes
- Learn valuable skills in electronics, aerodynamics, and craftsmanship
Many pilots say that flying a plane you built yourself gives a special satisfaction that store-bought models can’t match.

Credit: forum.flitetest.com
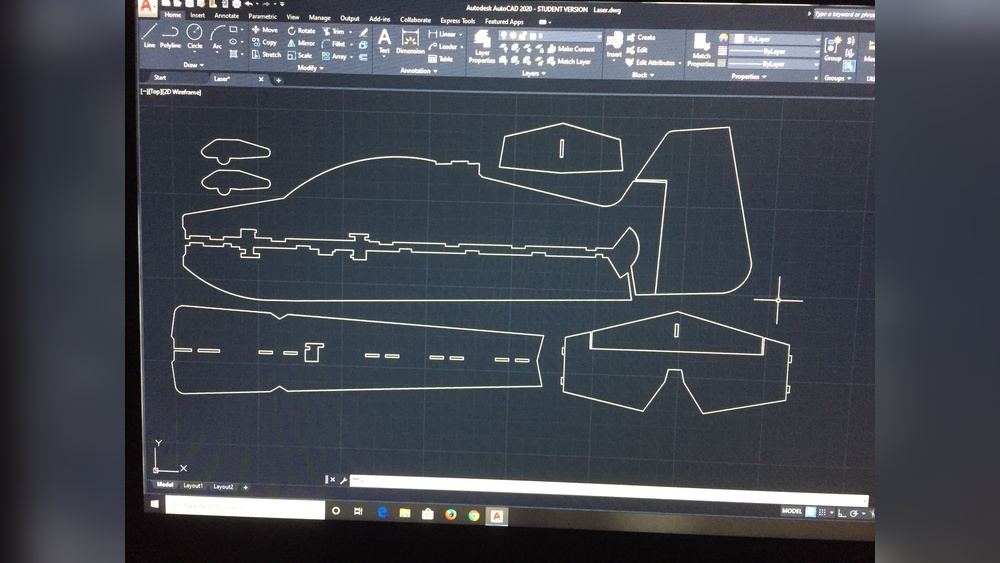
Understanding 3d Foamy Airplane Plans
A plan is a detailed blueprint showing all the parts, dimensions, and assembly steps for a foamy airplane. Reading and following these plans is the key to a successful build.
What’s Included In A Plan?
- Top and side views of the airplane
- Cutting outlines for foam pieces
- Locations for carbon fiber reinforcements
- Placement of electronics (motor, battery, servos)
- Step-by-step assembly notes
Some plans are free online, while others are sold by designers or clubs. Always check that the plan matches your skill level and equipment.
How To Choose A Plan
When selecting a 3D foamy airplane plan, consider:
- Skill Level: Beginners should start with simple, robust designs. Advanced builders can try more complex or realistic models.
- Size: Typical wingspans range from 24 to 36 inches (60–90 cm). Larger models are more stable, but need bigger flying spaces.
- Motor and Battery: Check what power setup the plan recommends. Make sure you can buy the right motor, ESC, and battery.
- Foam Type: Most plans specify Depron, EPP, or XPS foam. Each has different strength, flexibility, and weight.
- Intended Use: Some plans focus on slow park flying; others are optimized for wild 3D stunts.
Essential Materials And Tools
Building a foamy airplane is affordable, but you need the right supplies.
Foam Types
- Depron: Lightweight, easy to cut, but brittle. Great for indoor models.
- EPP: Flexible, crash-resistant, slightly heavier. Good for outdoor and beginner use.
- XPS (extruded polystyrene): Dense and strong, but heavier.
Hardware
- Carbon fiber rods or strips (1–3 mm diameter) for reinforcement
- Brushless motor (usually 20–30 grams, 1000–1500 kV)
- Electronic speed controller (ESC)
- Servos (3 or 4, typically 5–9 grams each)
- Micro receiver (compatible with your transmitter)
- Battery (2S or 3S LiPo, 300–600 mAh)
- Propeller (depends on motor and plan)
Other Supplies
- Hot glue gun or foam-safe CA glue
- Sharp hobby knife and spare blades
- Ruler, square, and marker
- Small screwdriver and soldering iron
- Lightweight tape (for hinges or repairs)
Cost Considerations
A basic 3D foamy build usually costs $30–$70, not including a transmitter/charger. If you crash, the foam is cheap to replace—often just a few dollars.
Step-by-step Guide: Building Your Own 3d Foamy Airplane
Let’s walk through the building process, from plan to maiden flight.
1. Print And Prepare The Plans
Download your chosen plan and print it full-size. Some plans are tiled for regular printers; others need a large-format printer. Tape together the sheets carefully, aligning the edges.
2. Transfer Outlines To Foam
Lay the plan over your foam sheet. Use a sharp hobby knife to trace the outlines, or pin the plan down and cut through both layers. Mark all slots, control surface lines, and reinforcement locations clearly.
3. Cut Out The Parts
Cut slowly and smoothly. Replace blades often—a dull knife tears foam. Use a metal ruler for straight lines. For curved edges, cut in several shallow passes.
4. Reinforce And Assemble The Frame
Insert carbon rods in the indicated slots. Glue them with a thin bead of hot glue or foam-safe CA. This step is critical—skipping reinforcements leads to floppy, uncontrollable planes.
Assemble the fuselage, wings, and tail surfaces according to the plan. Use minimal glue for a lighter airplane.
5. Install Electronics
Mount the motor to the nose or firewall using small screws. Glue or tape servos in place, making sure they are centered and can move freely. Route servo wires neatly.
Solder or connect the ESC to the motor. Secure the receiver and battery with velcro. Double-check that the control surfaces move in the correct direction.
6. Hinge And Connect Control Surfaces
Score the foam along the hinge lines (but don’t cut through). Flex the surfaces back and forth until they move smoothly. Some builders add a strip of clear tape along the hinge for extra strength.
Attach control horns to each surface, and connect pushrods from the servos. Adjust so everything is straight and moves fully.
7. Balance And Test
Place the battery to achieve the correct center of gravity (CG)—usually marked on the plan. An incorrect CG makes the plane hard to control. Secure all components, and do a full radio check.
8. Maiden Flight
Pick a calm day and a large, open space. Start with gentle throttle and small control inputs. Trim the airplane for level flight, then slowly test its 3D capabilities.
Popular 3d Foamy Airplane Plan Styles
There are hundreds of plan designs, but most fall into a few categories.
Profile 3d Planes
These are the simplest to build—flat fuselage, flat wings, and large control surfaces. They’re ultra-light and very agile.
- Best for: Beginners, indoor flying, practice
- Typical wingspan: 30 inches (76 cm)
- Example: The “Yak 54” and “Extra 300” profiles
Biplanes
With two wings, these designs are super stable and floaty. They’re great for slow, low-altitude tricks.
- Best for: Indoor 3D, relaxed flying, learning new maneuvers
- Typical wingspan: 26–34 inches (66–86 cm)
- Example: “Ultimate Bipe” or “Pitts Python” foamy
Scale-like 3d Foamies
Some plans mimic real aerobatic airplanes, with more detailed fuselages and wing shapes. These look great in the air but are a bit heavier.
- Best for: Experienced builders, outdoor flying, show models
- Typical wingspan: 32–36 inches (81–91 cm)
- Example: “Sukhoi SU-29”, “Edge 540”
Micro 3d Foamies
Tiny, ultra-light models for flying in gyms or living rooms. They require very light electronics and careful building.
- Best for: Indoor-only, advanced builders, small spaces
- Typical wingspan: 14–20 inches (35–50 cm)
Comparing Popular 3d Foamy Plan Types
Here’s how the main types stack up:
| Type | Difficulty | Typical Weight | Best Use |
|---|---|---|---|
| Profile | Easy | 90–130 g | Indoor, beginners |
| Biplane | Medium | 100–140 g | Indoor, stable tricks |
| Scale-like | Hard | 120–180 g | Outdoor, display |
| Micro | Advanced | 30–60 g | Indoor, small spaces |
Understanding The Electronics Layout
The electronics setup is crucial for safe and reliable flight. Here’s a breakdown of what you need and how each part fits into the plan.
Power System
- Motor: The plan will suggest a specific size and KV rating. For example, a 28g 1200KV outrunner.
- ESC: Must match or exceed the motor’s maximum amp draw.
- Battery: Usually 2S or 3S LiPo, with capacity matched to expected flight time and weight.
Control System
- Servos: 3 or 4 micro servos (one each for ailerons, elevator, rudder, sometimes dual ailerons).
- Receiver: Lightweight, compatible with your transmitter.
Wiring And Placement
Most plans show recommended locations to keep the CG correct. Too much weight forward or back makes the plane nose-heavy or tail-heavy.
Here’s a typical layout:
| Component | Location | Notes |
|---|---|---|
| Motor | Front (nose) | Secured to firewall |
| ESC | Behind motor | Airflow for cooling |
| Receiver | Center fuselage | Away from battery wires |
| Battery | Moveable (CG adjust) | Velcro or strap |
| Servos | Near control surfaces | Short pushrods |
Non-obvious Tips For Building And Flying
Many first-time builders overlook small details that make a big difference.
- Use the right glue: Regular super glue melts some foams. Always test on a scrap first or use foam-safe CA.
- Don’t skip reinforcements: Even a single missed carbon rod can cause midair failure.
- Balance before maiden: CG is more important than total weight. Move the battery to get it right.
- Program expo and rates: Use your transmitter to soften control responses—especially for beginners.
- Keep spare foam: Crashes are common. Having extra material means you can repair and fly again quickly.
- Check local rules: Some parks or indoor venues have restrictions on RC flying.
Common Mistakes And How To Avoid Them
Even careful builders can make mistakes. Here’s what to watch out for:
- Cutting parts inaccurately: Use a sharp knife and straightedge. Small errors can make the plane fly poorly.
- Using too much glue: Excess glue adds weight. Apply just enough for a strong bond.
- Wrong electronics placement: Follow the plan for servo and battery locations to ensure proper balance.
- Skipping pre-flight checks: Always test controls, motor direction, and balance before launch.
- Flying in wind: These planes are light and get tossed around easily. Wait for calm conditions.
Building For Durability
3D foamies are designed to survive crashes, but a few upgrades help:
- Use EPP foam for outdoor or rough flying—it flexes instead of breaking.
- Reinforce wingtips and nose with a strip of tape or thin plastic.
- Removable landing gear: Many plans allow gear to snap off in a crash instead of breaking.
- Spare parts: Keep extra pushrods, control horns, and props.
Finding And Downloading Quality Plans
There are many websites and forums where hobbyists share plans. Look for:
- Clear drawings with measurements in inches or millimeters
- Assembly notes or build logs
- Active community for advice and troubleshooting
A great resource for free and paid plans is RCGroups, one of the largest RC plane communities online.
Example: Building A Yak 54 Profile Foamy
Let’s look at a popular choice—the Yak 54 profile foamy. This plan is available in many sizes and is known for its forgiving flight and wild aerobatic capability.
Specs:
- Wingspan: 32 inches (81 cm)
- Weight: 120–135 g ready-to-fly
- Foam: 6 mm Depron or EPP
- Motor: 24–28g, 1000–1200KV
- Battery: 2S 450–600 mAh LiPo
Notable features:
- Large elevator and rudder for extreme 3D
- Simple, flat construction—good for beginners
- Easily repaired after a crash
Build notes:
- Use carbon rods in the wing and fuselage for stiffness
- Keep all electronics as light as possible
- Add tape hinges for durability
Many builders say the Yak 54 is the perfect first 3D foamy. It handles slow flight well and can float out of mistakes, but still does advanced tricks.
Advanced Customization
As you gain experience, you may want to tweak your plans:
- Adjust control surface size for faster or slower roll rates
- Switch foam types to balance durability and weight
- Change motor or prop size for more vertical power or longer flight times
- Paint or decorate your plane for better visibility and style
Just remember: every change affects flight, so test carefully after each modification.
Comparing 3d Foamy Airplane Vs. Other Rc Planes
How Do 3d Foamies Compare To Other Rc Types?
| Feature | 3D Foamy Airplane | Trainer RC Plane | Scale RC Plane |
|---|---|---|---|
| Weight | Very light (90–180g) | Medium (400–800g) | Heavy (800g+) |
| Flight Speed | Slow–medium | Medium | Medium–fast |
| Skill Level | Beginner–advanced | Beginner | Intermediate–advanced |
| Crash Resistance | High | Medium | Low |
| Best Use | 3D aerobatics | Learning basics | Scale realism |
Safety And Legal Considerations
Flying RC planes, even foamies, comes with responsibilities.
- Never fly near people, animals, or roads.
- Stay under 400 feet (120 m) altitude in most countries.
- Register your model if required by your local aviation authority.
- Join a club or association for insurance and legal support.
- Check battery safety: Always use a fireproof bag for charging LiPos.
Repair And Maintenance Tips
Crashes are part of the hobby. Here’s how to keep flying:
- Small cracks: Use foam-safe CA or hot glue.
- Broken control surface: Replace with new foam or tape hinge back together.
- Bent carbon rod: Replace if possible; heat gently to straighten.
- Electronics check: After a hard crash, test all servos and connections before flying again.
Many pilots say that repairing foamies teaches you as much as building them!
Getting The Most From Your 3d Foamy Airplane
Once you’ve built and flown your foamy, you can:
- Practice new tricks: Hovering, torque rolls, knife-edge flight
- Join online groups: Share photos and ask questions
- Compete at fun-fly events: Many clubs host 3D competitions
- Teach others: Pass on your knowledge to new pilots
The skills you learn with 3D foamies transfer to bigger, more complex RC models if you want to advance.

Credit: aerofred.com
Frequently Asked Questions
What Is The Best Foam For 3d Foamy Airplanes?
EPP is the top choice for durability and crash resistance, especially for beginners. Depron is lighter and better for indoor flying, but it breaks more easily. Choose based on your flying location and skill level.
How Much Does It Cost To Build A 3d Foamy Airplane?
Most builds (excluding the transmitter and charger) cost between $30 and $70. Electronics are the main expense. Foam and hardware are relatively cheap, and repairs are low-cost.
Can I Use Recycled Foam For Building?
Some builders use foam from packaging or insulation panels. However, model-grade foam (EPP, Depron) cuts better, is lighter, and gives better results. Recycled foam can work for simple trainers, but is not ideal for 3D flight.
How Long Does It Take To Build A 3d Foamy Airplane?
A basic profile 3D foamy can be built in 4 to 8 hours over a weekend. More complex or decorated models may take longer. Plan extra time for painting and electronics setup.
Where Can I Find Reliable 3d Foamy Airplane Plans?
Trusted sources include forums like RCGroups, designer websites, and some RC clubs. Look for plans with detailed drawings, build logs, and active community support. Always check reviews before starting a new plan.
Building your own 3D foamy airplane opens a world of flight possibilities. With the right plan, some practice, and a willingness to learn from mistakes, you’ll soon be performing stunts you never thought possible. Enjoy the journey—each flight teaches you something new!