How Many Quilt Squares for a Queen Size Quilt: Expert Guide 2025

Are you ready to start your next quilting project? If you’ve set your sights on creating a stunning queen-size quilt, you might be wondering exactly how many quilt squares you’ll need.
This is a crucial step that can make the difference between a quilt that fits perfectly and one that doesn’t quite measure up. Imagine the satisfaction of laying out your finished quilt, knowing each square was thoughtfully planned and perfectly placed.
We’ll guide you through the process of determining the correct number of quilt squares for a queen-size quilt, ensuring your creation is both beautiful and functional. So grab your fabric, and let’s dive into the details to make your quilting dreams a reality!
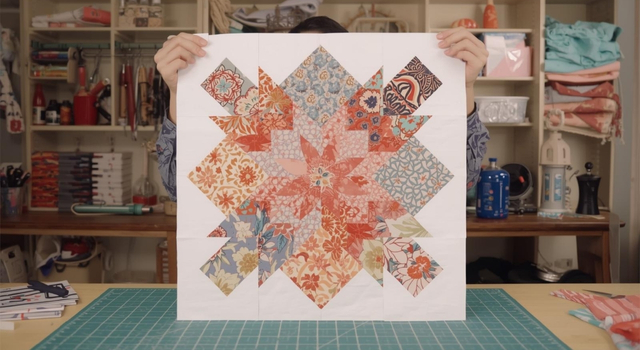
Credit: www.generations-quilt-patterns.com
How Many Quilt Squares for a Queen Size Quilt: Understanding Quilt Sizing
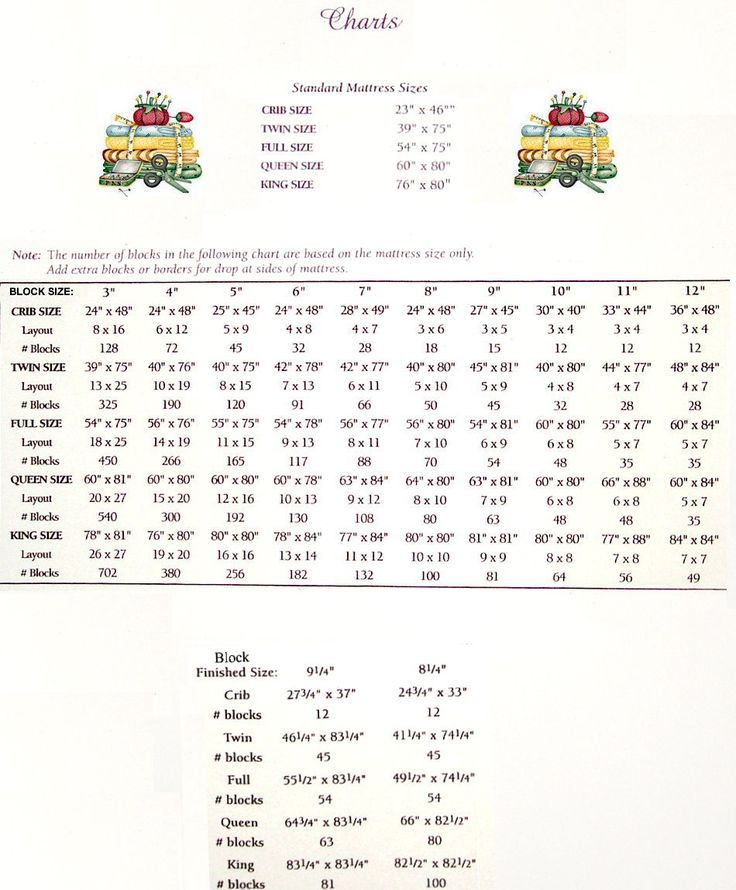
Crafting a queen-size quilt involves understanding quilt square dimensions. Typically, 12-inch squares are ordinary. To cover a queen bed, about 30-42 squares are needed, depending on the design and layout preferences.
Understanding quilt sizing can be a game-changer for any quilting enthusiast. Whether you’re a seasoned quilter or a beginner, knowing the right size for your quilt squares can save you time and effort.
Let’s dive into the details of quilt sizing to ensure your queen-size quilt turns out just right.
Standard Queen Size Dimensions
A standard queen-size bed typically measures 60 inches wide by 80 inches long. Quilts for this bed size usually range from 86 to 88 inches in width and 96 to 100 inches in length. These extra inches allow the quilt to drape nicely over the sides of the bed and provide coverage at the foot.
Consider the seam allowances and shrinkage from washing when planning your quilt. You don’t want to end up with a quilt that’s too small. Always check your measurements twice to ensure everything fits perfectly.
Variations In Quilt Sizes
Not all queen-size quilts are created equal. Some people prefer their quilts to hang lower on the sides for a more luxurious look, while others like a snug fit. This can change the number of quilt squares you’ll need. Think about your personal preference and how you want the quilt to look on your bed.
Do you like a longer drop on the sides? If so, you might want to add a few extra rows of squares. There’s also the consideration of the quilt pattern itself.
Some patterns might require more or fewer squares to achieve the desired design. How do you envision your quilt turning out? This vision will guide the number of squares you need.
Calculating Quilt Squares
Creating a queen-size quilt involves planning and precision. Calculating the number of quilt squares is crucial. This step ensures a perfect fit for your bed. Let’s break down the process into simple steps.
Determining Square Size
The size of each square affects the quilt’s overall look. Choose a square size that suits your design. Standard sizes range from 6 to 12 inches. Smaller squares create intricate patterns. Larger squares simplify the design. Decide based on your skill level and design preference.
Total Squares Needed
A standard queen-size quilt measures about 90 by 108 inches: to find out how many squares you need, use simple math. Divide the quilt’s dimensions by the size of your squares. For example, with 9-inch squares, you’ll need 10 squares across the width. For the length, you need 12 squares.
Calculate carefully. This step ensures your quilt covers the bed adequately. Double-check your measurements for accuracy. Consider adding extra squares for mistakes or design adjustments. This practice provides flexibility during the quilting process.
Choosing Fabric
Fabric selection is crucial for creating a stunning queen-size quilt. It influences the quilt’s texture, appearance, and durability. The right fabric sets the tone and feel of the quilt. It’s not just about looks; functionality matters too.
Selecting Fabric Types
Consider cotton for its softness and breathability. It’s a favorite for quilts. Cotton blends offer durability and easy maintenance. They resist wrinkles and shrinkage. Flannel adds warmth and comfort, perfect for cozy quilts. Silk provides a luxurious feel but needs delicate handling.
Wool is ideal for insulation but may require special care. Polyester fabrics are strong and resistant to stains, making them practical. Choose based on the quilt’s purpose and the climate.
Color And Pattern Considerations
Color impacts the quilt’s mood and style. Bright colors add energy and vibrancy. Soft tones create a calming effect. Consider the room’s decor and personal preference.
Patterns add personality and depth. Floral designs bring elegance and charm. Geometric shapes offer modernity and structure. Mix patterns for a unique look or keep it simple for a classic style.
Ensure the colors and patterns complement each other. Balance is key. A well-chosen fabric combination enhances the quilt’s beauty and coherence.

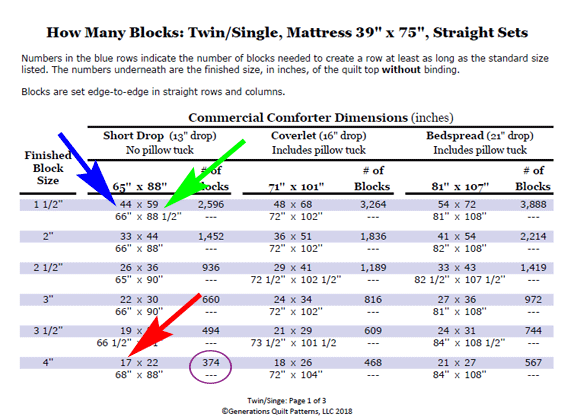
Credit: sewcanshe.com
Designing The Quilt Layout
Crafting a quilt layout involves selecting the correct number of squares for a queen-size quilt. Typically, 90 to 100 squares fit well, depending on the design and pattern chosen. Each square’s size impacts the overall quilt dimensions.
Designing the layout of your quilt is a creative adventure that can transform a simple quilt into a personal masterpiece. Deciding how many quilt squares you need for a queen-size quilt involves more than just numbers; it’s about visual harmony and individual flair. As you begin this design journey, think about the mood you want your quilt to convey.
Do you like bold and vibrant or soft and calming? Your choices in block arrangement and borders will bring your vision to life.
Block Arrangement Techniques
The way you arrange your quilt blocks can dramatically change the quilt’s overall look. You might opt for a simple grid pattern, which is classic and easy to follow.
Alternatively, consider a more dynamic approach like a chevron or diagonal pattern for added interest. Experiment with different layouts before sewing. Lay your blocks on the floor or use design software to visualize the final product. Don’t be afraid to rearrange until you find a pattern that feels just right.
Incorporating Borders And Sashing
Borders and sashing can frame your quilt beautifully, adding both structure and style. A border can make your quilt larger and give it a finished look. Choose colors that complement your blocks to tie the whole design together. Sashing, or the strips between blocks, can help each block stand out. It can add a sense of order and calm to a busy quilt. Consider varying the width of sashing to create depth and interest. Are you ready to add your personal touch? Borders and sashing are your canvas, so let your creativity flow.
Cutting And Preparing Fabric
Creating a queen-size quilt involves cutting around 88 quilt squares. Each square typically measures 10 inches. This ensures the quilt covers the bed comfortably, leaving room for seams.
Cutting and preparing fabric is a crucial step in quilt-making. It influences the final look and quality of your queen-size quilt. Proper preparation ensures your quilt squares align perfectly. This process includes selecting tools, prewashing, and ironing.
Tools For Precision Cutting
Using the right tools is essential for accurate cuts. A rotary cutter is a popular choice for quilters. It ensures clean and precise edges. Pair it with a self-healing cutting mat. This mat protects surfaces and prolongs blade life.
A transparent acrylic ruler is also helpful. It aids in measuring and aligning fabric accurately. These tools make cutting faster and more precise.
Prewashing And Ironing Fabric
Prewashing fabric prevents shrinkage later. It also removes excess dyes. Use a gentle detergent and cold water. After washing, let the fabric air dry. Iron the fabric to remove wrinkles. A smooth fabric is easier to cut. Ironing ensures each square is the correct size. It also improves the overall appearance of your quilt.

Sewing Quilt Squares
Creating a queen-size quilt typically involves sewing about 80 to 100 quilt squares. The number of squares depends on their size and your desired pattern. Smaller squares mean more pieces, while larger ones require fewer.
Sewing quilt squares is an essential skill for anyone looking to craft a beautiful queen-size quilt. It’s more than just stitching fabric together; it’s about creating a masterpiece that reflects your creativity and patience. Understanding the techniques and nuances can make the process smoother and more enjoyable.
Basic Sewing Techniques
Mastering basic sewing techniques is the first step in quilting success. Start with a simple straight stitch, which will be your best friend throughout this journey. Consider practicing on scrap fabric to gain confidence before moving on to your quilt squares. Consistency is key.
Ensure your seam allowances are uniform to avoid uneven edges. A quarter-inch seam is often recommended for quilting projects, providing a sturdy yet neat finish.
Joining Squares Accurately
Accurate joining of quilt squares can be the difference between a quilt that lies flat and one that’s a bumpy mess. Aligning the corners ideally requires patience and precision. Use pins or clips to hold the squares in place before sewing. Chain piecing is a helpful technique where you sew multiple squares in a continuous line without cutting the thread between them. This method saves time and keeps your squares organized.
Have you ever wondered how experienced quilters make it look so effortless? It’s all about these small, efficient practices. Take a moment to press your seams after joining.
A well-pressed seam not only looks professional but also ensures your quilt lies flat. Remember, quilting is an art, and every stitch you make is a step closer to creating something extraordinary.
Adding Batting And Backing
Crafting a queen-size quilt involves arranging quilt squares to measure 86 inches by 93 inches. Adding batting and backing enhances warmth and structure, providing a cozy finish to your quilt project. Typically, 144 squares of 6-inch size are needed to achieve the desired dimensions for a queen-size quilt.
Creating a quilt is like piecing together a fabric puzzle, and once you’ve assembled your quilt squares for a queen-size quilt, it’s time to add the essential layers of batting and backing.
These layers not only add warmth and comfort but also give your quilt a finished look. Choosing the right materials for these steps can make a significant difference in the final product.
Choosing The Right Batting
Selecting the batting can feel overwhelming with so many options available. Consider what you want from your quilt: warmth, weight, or loft? Natural fibers like cotton provide breathability and comfort, while synthetic options like polyester offer durability and are lightweight.
I once used a cotton-poly blend and found it gave a nice balance of warmth and weight, perfect for year-round use. Think about the quilt’s purpose. Will it be a cozy winter blanket or a decorative summer throw? This will guide your choice.
Attaching The Backing
The backing is like the quilt’s canvas, holding everything together. Choose a fabric that complements the quilt top in both color and texture. You can attach the backing by laying it flat and smoothing out any wrinkles. Secure it in place with safety pins or a basting spray to prevent shifting.
A friend of mine once skipped this step, and her quilt ended up with pesky bunches. Always ensure your backing is slightly larger than the quilt top to allow for any shifting during the quilting process. Would you experiment with a bold pattern for the backing, or do you prefer a subtle touch?
Quilting And Finishing Touches
Creating a queen-size quilt involves more than just assembling squares. The quilting and finishing touches bring your creation to life. These elements add depth, personality, and durability to your quilt. Mastering these skills ensures your quilt stands the test of time.
Quilting Patterns And Techniques
Quilting patterns add texture and design to your quilt. Simple patterns like straight lines or grids work well for beginners. Experienced quilters might try more complex designs like feathers or spirals. Choose a pattern that complements your quilt’s theme and colors.
Decide whether to quilt by hand or use a sewing machine. Hand quilting offers a traditional touch, while machine quilting is quicker.
Binding And Labeling The Quilt
Binding finishes the edges of your quilt neatly. It protects the quilt’s edges from wear and tear. Choose a binding fabric that matches or contrasts with your quilt. Cut binding strips and sew them around the quilt’s edges. Miter the corners for a polished look.
Labeling your quilt adds a personal touch. Include your name, the date, and any special message. Use a fabric pen or embroidery for a lasting label. A label tells future generations about the quilt’s creator and history.
Frequently Asked Questions
What Size Are Quilt Squares For A Queen?
Quilt squares for a queen-size quilt typically measure 8 to 12 inches. This size ensures proper coverage and visual appeal. The exact size can vary based on the pattern design and personal preference. Larger squares reduce sewing time, while smaller ones offer more intricate patterns.
How Many Squares are Needed For a Queen Quilt?
A queen-size quilt generally requires around 80 to 100 squares. The exact number depends on the square size and the quilt design. Larger squares need fewer pieces, while smaller squares require more. Always calculate based on desired dimensions and pattern complexity for accuracy.
Can I Use Different Square Sizes?
Yes, using different square sizes is possible and can enhance quilt design. Mixed sizes create interesting patterns and textures. Ensure careful planning for seamless integration and visual balance. Using varied sizes allows for creativity and customization of your quilt project.
What Pattern Suits A Queen-Size Quilt?
Popular patterns for queen-size quilts include patchwork, log cabin, and star designs. These patterns offer versatility and visual interest. Choose a pattern that complements your style and skill level. Consider using bold colors or intricate designs for a unique touch.
Conclusion
Creating a queen-size quilt involves thoughtful planning. Start by choosing your quilt design. Count the number of squares needed. Typically, 80-100 squares fit well. Consider the size of each square. Smaller squares need more pieces. Larger squares might use fewer.
Mix colors and patterns for visual interest. Experiment with layouts before sewing. This ensures a balanced look. Keep in mind seam allowances. They affect the final size. A quilt is more than just fabric. It’s a blend of creativity and comfort.
Enjoy the process and the warmth it brings. Your unique quilt will surely impress.