Gretchen Quilt Block Tutorial: Master This Classic Design
Are you ready to unlock the secrets of creating stunning quilt designs with ease? The Gretchen Quilt Block Tutorial is your gateway to mastering a classic quilting pattern that combines simplicity with elegance.
Whether you’re a seasoned quilter or just starting your quilting adventure, this tutorial is crafted to guide you through each step, making the process enjoyable and stress-free. Imagine the satisfaction of piecing together vibrant fabrics into a cohesive design that you can proudly display or gift.
This tutorial is designed not only instruct but to inspire, allowing your creativity to flourish. Dive in and discover how you can transform your fabric collection into a beautiful Gretchen quilt block masterpiece.
Credit: blog.fatquartershop.com
Materials And Tools
Embarking on the journey of creating a Gretchen Quilt Block is both exciting and rewarding. The magic begins with gathering the right materials and tools to ensure your quilting project is a success.
Whether you’re a seasoned quilter or a curious beginner, having the essentials on hand can make your experience smooth and enjoyable.
Essential Fabrics
Choosing the right fabric is crucial. Opt for high-quality cotton as it offers durability and ease of handling.
Consider selecting a mix of vibrant and neutral colors to add depth and contrast to your quilt block. Using pre-cut fabric bundles like fat quarters can save you time and ensure a cohesive look.
Have you ever noticed how the right fabric can tell a story? Think about the color combinations that speak to your personality and style.
Necessary Equipment
A reliable sewing machine is your best friend in this project. Ensure it’s clean and well-oiled for smooth stitching.
A rotary cutter, cutting mat, and ruler are indispensable for precise fabric cuts. Accuracy in your cuts is the foundation of a well-aligned quilt block.
Do you have a favorite tool that makes your quilting process more enjoyable? A pair of sharp fabric scissors and pins can also be handy for quick adjustments.
Remember to have an iron and an ironing board nearby. Pressing your fabric as you sew helps achieve a polished and professional finish.
Now that you have the right materials and tools, imagine the beautiful quilt block you’ll create. What unique design will you bring to life? With each stitch, you’re not just crafting a block, but weaving a story. Share your thoughts and experiences below – your insights could inspire fellow quilters!

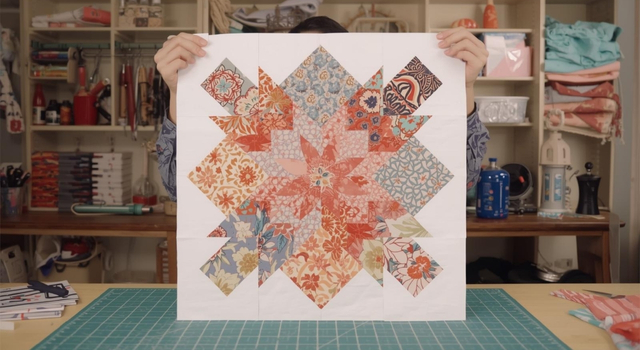
Credit: www.youtube.com
Preparing Fabrics
Preparing fabrics is crucial for the Gretchen Quilt Block Tutorial. Ensure fabrics are clean and ironed before starting. This helps in cutting precise pieces and achieving a polished quilt block.
Preparing fabrics for your Gretchen Quilt Block is a crucial step that sets the foundation for a beautifully crafted quilt. This stage involves selecting the right colors and mastering precise cutting techniques.
It’s an opportunity to let your creativity shine while ensuring your quilt pieces fit together perfectly. Whether you’re a seasoned quilter or a beginner, focusing on fabric preparation can make the quilting process smoother and more enjoyable.
Selecting Color Schemes
Choosing the right color scheme can transform your quilt into a work of art. Start by considering the mood or theme you want your quilt to convey. Are you aiming for a calm, serene look or something vibrant and eye-catching?
Experiment with different color combinations. Use a color wheel to find complementary colors or try a monochromatic scheme for a more subtle effect. Don’t be afraid to mix patterns and solids to add depth and interest. Think about the room where your quilt will be displayed.
Will the colors harmonize with the existing decor? Sometimes, a bold pop of color can act as a stunning focal point. Trust your instincts and have fun with the process.
Cutting Techniques
Precision in cutting ensures your quilt pieces fit together seamlessly. Begin by measuring your fabric twice before cutting once. This simple step can save you a lot of frustration later on.
Use a rotary cutter and a self-healing mat for clean, accurate cuts. A sharp blade is essential, so replace it if it starts to snag the fabric. Always align your fabric carefully with the grid lines on your mat. Organize your fabric pieces into piles according to size and shape. This will help you stay organized and avoid mistakes.
Remember, accuracy in cutting leads to a quilt block that matches perfectly, creating a polished finish. Have you ever cut fabric only to find your pieces don’t match? It happens to the best of us. With practice and patience, your cutting skills will improve, making the quilting process more enjoyable.
Piecing The Quilt Block
Creating a quilt block is like piecing together a puzzle where each piece fits perfectly to form a beautiful design. The Gretchen Quilt Block is no exception, and piecing it together is an adventure of colors and textures.
Imagine holding the vibrant fabric squares in your hands, aligning them with precision, and sewing them into a cohesive block. It’s a satisfying process that demands both creativity and attention to detail. Let’s dive into the specifics of assembling the Gretchen Quilt Block and make sure each seam aligns flawlessly.
Step-by-step Assembly
First, gather your materials: fabric squares, scissors, pins, and a sewing machine. Lay out your fabric squares in the Gretchen pattern to visualize the design.
Start by sewing two squares together. Use a quarter-inch seam allowance, ensuring the edges align perfectly.
Proceed by adding more squares to the sewn pieces. Press the seams open with an iron to keep them flat and neat.
Continue piecing the squares together until you complete the block. Each stitch should be straight and uniform, contributing to a polished look.
Remember, patience is key during assembly. Take your time to ensure each square is aligned correctly, leading to a seamless final product.
Aligning Seams
Seam alignment is crucial for a professional-looking quilt block. Misaligned seams can disrupt the pattern, affecting the overall design.
Use pins to hold your fabric squares together before sewing. This helps maintain alignment as you stitch each seam.
Pressing seams properly is equally important. After sewing, press them open or to one side, depending on your preference.
Consider using a seam guide on your sewing machine for consistent seam allowances. This tool can be a lifesaver for beginners.
Ask yourself, have you ever felt the thrill of achieving perfectly aligned seams? The satisfaction of seeing your quilt block come together seamlessly is truly rewarding.
By focusing on seam alignment, you enhance both the aesthetic and structural integrity of your quilt block. Each aligned seam is a step closer to a masterpiece.
As you piece your Gretchen Quilt Block, remember that every stitch is a part of your quilting journey. Enjoy the process, embrace the challenges, and cherish the final product.
Adding Borders
Discover how to enhance the Gretchen Quilt Block with elegant borders. Borders add depth and interest, framing your quilt beautifully. This tutorial guides you through the process with easy steps.
Adding borders to your Gretchen Quilt Block can transform your project from simple to stunning. Borders frame your quilt, providing a polished finish and a chance to express your unique style.
They also help in balancing the colors and patterns within the quilt, giving it a cohesive look. Let’s explore how you can effectively add borders to your quilt block.
Choosing Border Styles
Selecting the right border style is crucial. Think about the overall look you want for your quilt. Do you prefer a simple, classic look or something more intricate?
Straight borders offer a clean and traditional appearance, while mitered or pieced borders can add complexity and flair. Consider the color and pattern.
A bold, contrasting border can make your quilt block pop, while a subtle, matching one can create harmony. Reflect on your quilt’s theme and the mood you want to evoke. Your choice can make a big difference in the final appearance.
Proper Measurements
Accurate measurements are key to a professional-looking quilt. Measure your quilt block carefully before cutting your borders. Ensure that each side is even, and remember to account for seam allowances. Use a ruler and cutting mat for precision.
Double-check measurements to avoid mistakes that can lead to frustration later. It’s worth taking the extra time here to ensure a perfect fit. Have you ever noticed how a slight error can lead to a wonky border?
Measure twice, cut once. This mantra can save you from unnecessary headaches and wasted fabric. Adding borders not only enhances your quilt’s beauty but also challenges your creativity and precision. What border style will you choose for your next quilt project?
Quilting Techniques
Quilting is a cherished craft that combines art and skill. The Gretchen Quilt Block Tutorial offers a chance to explore different quilting techniques. Each technique adds a unique touch to your quilt.
Whether you prefer the traditional feel of hand quilting or the speed of machine quilting, both methods bring their own charm. Let’s explore these quilting techniques.
Hand Quilting Basics
Hand quilting is a soothing process. It involves stitching by hand. This method requires a needle, thread, and patience. Start by choosing a simple design. A small hoop can help hold the fabric. Use a running stitch for even lines. This creates a classic, handmade look. Practice makes perfect. Begin with small projects.
Hand quilting allows for personal touches. You can add unique patterns. Each stitch tells a story. It’s a great way to relax. Many quilters find joy in the process. It connects them to the tradition of quilting. Hand quilting can be done anywhere. All you need is your materials.
Machine Quilting Options
Machine quilting is faster than hand quilting. It uses a sewing machine. This method is great for large projects. There are different options to explore. Straight-line quilting is simple and clean. Free-motion quilting allows for creativity. You can create complex designs easily.
Choose the right machine settings. Adjust the stitch length and tension. Use the correct needle and thread. Practice on scrap fabric first. This helps you perfect your technique. Machine quilting saves time. It gives quilts a modern look. Many quilters enjoy the speed and precision.
Whether you choose hand or machine quilting, each method has its benefits. Both add beauty to your quilt. Explore each technique and find what suits you. Happy quilting!
Credit: www.quilterscache.com
Finishing Touches
Completing the Gretchen Quilt Block is a rewarding experience. The final steps enhance its beauty and longevity. These finishing touches add a personal touch to your quilt. Let’s explore these essential steps.
Binding The Edges
Binding the edges gives your quilt a clean finish. Choose a fabric that complements your quilt’s design. Cut strips of fabric, about 2.5 inches wide. Sew them together to form a long strip. Press the strip in half, lengthwise.
Align the raw edges of the binding with the quilt’s edges. Sew the binding to the front of the quilt. Use a quarter-inch seam allowance. Fold the binding over the edge to the back. Hand-stitch it for a neat look. Binding secures the edges and adds durability.
Adding Labels
Adding a label personalizes your quilt. It tells a story. Write your name, date, and a special message. Use a fabric marker or embroidery. Place the label on the back of the quilt. Sew it securely. A label marks your creation for years to come. It adds a personal touch and preserves your quilt’s history.
Troubleshooting Tips
Need help with the Gretchen Quilt Block? Identify fabric orientation issues easily. Ensure precision cutting to avoid mismatched seams.
When tackling the Gretchen Quilt Block, you might encounter some bumps along the way. Don’t worry; you’re not alone. Even seasoned quilters face challenges with this complex block.
The key is knowing how to troubleshoot effectively. Let’s explore some common mistakes and the easy fixes to get your quilt block looking fabulous.
Common Mistakes
One frequent issue is incorrect fabric alignment. It’s easy to misjudge angles, especially if you’re rushing through the process. You might find yourself with edges that don’t match up, leading to a skewed block.
Double-check your fabric alignment before sewing to avoid this problem. Another common mistake is inconsistent seam allowances. If your seams aren’t uniform, your block could end up lopsided. Keep a seam guide handy. It helps maintain the standard seam width throughout your project.
Sometimes, color choices can be misleading. A fabric that seems perfect might clash once sewn into the block. Lay out your pieces before committing to a design. This visual check can prevent a mismatched quilt block.
Easy Fixes
Misaligned fabrics can be frustrating. But a seam ripper is your best friend here. Carefully undo the stitches and realign your pieces. Take a deep breath and try again; precision is key.
For inconsistent seam allowances, try using a quarter-inch foot on your sewing machine. This tool ensures each seam is the correct size. Practice on scrap fabric to build confidence in maintaining even seams. If color choices go awry, consider swapping out conflicting pieces. Sometimes, a small change can make a big difference.
Alternatively, add a neutral fabric to balance the overall look. Remember, every mistake is a learning opportunity. Have you encountered unexpected challenges with your quilting?
Embrace them; they make you a better quilter. Don’t let small setbacks deter your quilting journey. Each correction brings you one step closer to mastering the Gretchen Quilt Block.
Frequently Asked Questions
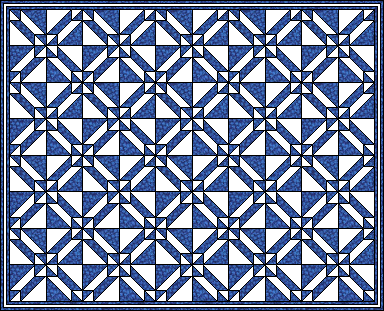
What Is A Gretchen Quilt Block?
The Gretchen quilt block is a traditional design featuring geometric shapes. It often includes squares and triangles arranged in a symmetrical pattern. This block is popular for its versatility and can be used in various quilting projects to create visually appealing designs.
How To Choose Fabric For Gretchen Blocks?
Select fabrics with contrasting colors and patterns to enhance the block’s design. Use high-quality cotton for durability. Consider using solids and prints to add depth. Ensure fabrics complement each other, creating a cohesive look in your quilt project.
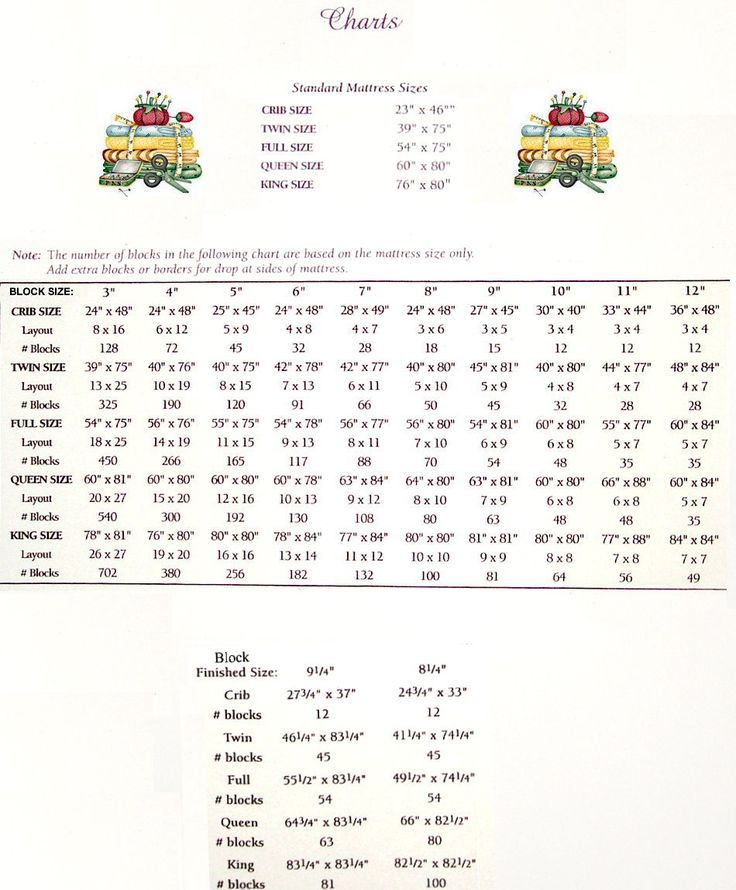
What Size Should Gretchen Blocks Be?
Gretchen quilt blocks typically range from 6 to 12 inches. The size can vary based on the quilt’s overall design. Larger blocks showcase intricate details better. Smaller blocks may require more pieces, offering a different aesthetic and challenge for quilters.
Can Beginners Make Gretchen Quilt Blocks?
Yes, beginners can make Gretchen quilt blocks by following simple tutorials. Practice basic sewing techniques and accurate measurements. Start with larger blocks for ease. Gradually progress to more complex designs as you gain confidence in your quilting skills.
Conclusion
Creating a Gretchen Quilt Block is a rewarding experience. Simple steps lead to beautiful designs. This tutorial guides you through each stage. Practice makes perfect, so keep trying. You’ll soon create stunning quilt blocks. Share your creations with friends or family.
Enjoy the process and take pride in your work. Quilting is fun and soothing. Use your creativity to design unique pieces. Dive into quilting and explore new patterns. The Gretchen Quilt Block is just the beginning. Keep learning and crafting more quilt blocks.
Your quilting journey starts here. Happy quilting!