How to Bind Rc Transmitter And Receiver: Easy Guide
Are you ready to take your remote control hobby to the next level? Whether you’re into flying drones, racing cars, or piloting boats, the connection between your RC transmitter and receiver is crucial.
Without this essential bond, your gadgets are just fancy paperweights. But fear not! Binding your RC transmitter and receiver is simpler than you might think. Imagine the thrill of having complete control at your fingertips, steering your creations with precision and ease.
In this guide, we’ll walk you through the steps to ensure a seamless connection, so you can focus on what truly matters — the joy of RC adventures. Let’s dive in and unlock the potential of your RC devices together!

Credit: www.youtube.com
Understanding Rc Systems
RC systems might seem complex at first glance. Yet, they are fascinating. They let us control models from a distance. This includes cars, planes, and boats. Getting to know the basics makes it easier to use them.
What Are Rc Systems?
RC stands for Radio Control. This system uses radio waves. These waves send signals to the model. The transmitter sends the signals. The receiver gets them. Then, the model acts on these signals.
Components Of An Rc System
RC systems have several parts. The transmitter is a handheld device. It sends out commands. The receiver is inside the model. It gets the commands. The model then moves accordingly.
How Do Rc Systems Work?
The transmitter and receiver work together. The transmitter sends a signal. The receiver picks it up. Then, it tells the model what to do. This process happens quickly.
Frequency And Channels In Rc Systems
RC systems work on specific frequencies. This prevents interference. Each model uses a different channel. This allows multiple models to run together. Without affecting each other.
Importance Of Binding Transmitter And Receiver
Binding is crucial. It pairs the transmitter with the receiver. It ensures they communicate. Without binding, the model won’t respond. It’s a simple yet important step.
Choosing The Right Transmitter And Receiver
Binding an RC transmitter and receiver involves setting them to communicate properly. Start by ensuring both devices are compatible. Follow the manufacturer’s instructions to sync them, ensuring stable control of your model.
Choosing the right RC transmitter and receiver is crucial for ensuring a seamless connection between your remote control and your model. Selecting the right pair can be the difference between a smooth flight and a frustrating experience. With numerous options available, how do you ensure you’re making the right choice?
Understanding Your Needs
First, ask yourself what you need from your RC setup. Are you flying a basic drone or a high-performance racing car? For a simple setup, a basic transmitter with fewer channels might suffice.
However, for complex models, you’ll need a transmitter with more channels to control additional functions.
Compatibility Matters
Ensure that your transmitter and receiver are compatible. Often, they need to be from the same brand. Even if they’re from different brands, check that they support the same protocol. It’s akin to ensuring your smartphone and charger speak the same “language.”
Consider The Frequency
Most modern RC systems operate on 2.4 GHz. This frequency provides a good balance of range and interference resistance. However, if you’re flying in a crowded area, you might need a system that can switch frequencies to avoid interference.
Budget Vs. Quality
While it’s tempting to go for the cheapest option, remember that quality matters. Inexpensive transmitters may lack range or precision. Investing a bit more can provide better control and longevity. Reflect on this: Is it worth compromising your experience for a few dollars?
Look For User-friendly Features
Some transmitters come with features like LCD screens or programmable settings. These can be helpful, especially for beginners. They allow you to adjust settings easily and understand what’s happening at a glance.
Personal Experience With The Right Gear
When I first started with RC planes, I chose a budget transmitter. The limited range resulted in several crash landings. After upgrading to a higher-quality model, my experience improved dramatically. It’s a lesson in the importance of investing wisely.
Seek Recommendations
Join online forums or local clubs to get advice. Fellow enthusiasts can offer insights based on their experiences. Often, personal recommendations are more reliable than online reviews. Remember, the right transmitter and receiver can significantly enhance your RC experience.
Make informed choices, and your hobby will be more enjoyable and rewarding. What factors do you consider most important in your selection process?
Preparing for the Binding Process
Start by gathering all necessary tools and equipment for binding your RC transmitter and receiver. Ensure both devices are compatible and fully charged. Follow the manufacturer’s instructions closely to achieve a successful connection.
Preparing for the binding process of your RC transmitter and receiver is crucial for a seamless experience.
This step ensures that your equipment communicates effectively, allowing you to control your RC vehicle with precision. Whether you’re a seasoned hobbyist or a beginner, understanding how to prep for this process can save you time and frustration.
Gather Your Equipment
Before you start, ensure you have all the necessary equipment at hand. This includes your RC transmitter, receiver, and any specific cables or tools required for binding. Check your instruction manuals for any model-specific components.
Check Battery Levels
Low battery power can interrupt the binding process. Ensure both your transmitter and receiver have fully charged batteries. This simple check can prevent many common binding issues.
Find A Safe Workspace
Choose a well-lit area free from distractions. Ensure your workspace is clear of clutter and has enough room to comfortably handle your equipment. A stable surface is crucial for setting up.
Read The Instruction Manual
Even if you’re familiar with the process, each model has its nuances. Skim through the manual to spot any unique steps for your specific transmitter and receiver. This ensures you’re not missing any critical steps.
Set Your Frequency
Ensure your transmitter and receiver are set to the same frequency. This alignment is essential for them to communicate effectively. Adjusting frequency settings might seem technical, but most manuals make it straightforward.
Wear Safety Gear
While binding is generally safe, having protective gear like goggles can safeguard your eyes from unexpected sparks or malfunctions. A simple precaution that can make a big difference.
Plan For Interruptions
Consider potential interruptions. If you have pets or small children, plan to bind when you won’t be disturbed. A smooth binding process requires focus and uninterrupted time. Preparing thoroughly can transform your binding experience from stressful to smooth. What steps do you usually take to ensure your RC setup works flawlessly? Share your insights below!
Setting Up Your Transmitter
Setting up your transmitter is crucial for a successful RC experience. This step ensures your transmitter communicates effectively with your receiver. A smooth setup prevents connectivity issues and keeps your RC device running optimally. Let’s explore the steps to properly configure your transmitter.
Understanding Your Transmitter’s Functions
Learn the basic functions of your transmitter. Each button and switch has a purpose. Familiarize yourself with the layout. This knowledge helps in setting up correctly. Read the manual for detailed information.
Choosing The Right Mode
Transmitters have different modes, usually Mode 1 or Mode 2. Mode affects how controls operate. Determine which mode suits you best. Beginners often prefer Mode 2 for easier control. Check your transmitter for mode settings.
Adjusting Throttle And Trim
Proper throttle and trim adjustment is vital. Set the throttle stick to the neutral position. Adjust trims until controls feel balanced. This ensures your RC device responds accurately. Check the manual for specific instructions.
Setting Frequency And Channels
Ensure your transmitter and receiver share the same frequency. This prevents signal interference. Assign channels based on your device’s functions. Each channel corresponds to a specific function. Refer to your manual for channel setup.
Test the connection between transmitter and receiver. Ensure all channels work correctly. Move controls and observe the response. A proper test confirms a successful setup. Troubleshoot any issues promptly.
Powering Up The Receiver
To connect an RC transmitter and receiver, start by powering up the receiver. Ensure batteries are inserted correctly. Then, follow the binding instructions specific to your model for a successful pairing.
Powering up the receiver is a crucial step in binding your RC transmitter and receiver. This process ensures that your receiver is correctly connected and ready to communicate with your transmitter.
If you’ve ever experienced the frustration of a non-responsive RC vehicle, you’ll understand the importance of this step. Properly powering up your receiver can make all the difference in a smooth, enjoyable RC experience.
Understanding Receiver Power Requirements
Before you power up, check the receiver’s power requirements. Most receivers operate on a specific voltage range, often between 4.8V and 6V. Using the wrong voltage can damage your equipment. Consult your receiver’s manual for precise details. If you’re unsure, it’s better to double-check than to risk damage.
Choosing The Right Power Source
Decide whether you’ll use a battery pack or tap into the vehicle’s main battery. A separate battery pack provides a stable power source, minimizing risks of interference.
If you opt for the main battery, ensure it’s compatible. Using a voltage regulator can prevent overloading the receiver.
Connecting The Power Source
Connect the power source to the receiver using the appropriate cables. It’s essential to ensure a secure connection to prevent power loss during operation. Watch out for loose connections.
They can lead to sudden disconnections mid-flight or mid-drive, which could spell disaster for your RC vehicle.
Safety Checks Before Powering Up
Perform a quick safety check before powering up. Ensure there are no exposed wires, and the connections are firm. Think about potential distractions and eliminate them. A moment of inattention could lead to an oversight, affecting your entire setup.
Testing The Power Connection
Once connected, test the power by turning on the receiver. Look for indicator lights or signals that confirm power is flowing. If the receiver doesn’t power up, recheck your connections. It might be a simple fix that saves you time and effort later on.
Engaging with your RC vehicle can be a thrilling experience. But have you ever wondered if a simple oversight in powering up could affect your overall enjoyment? Share your thoughts and any tips you might have in the comments!
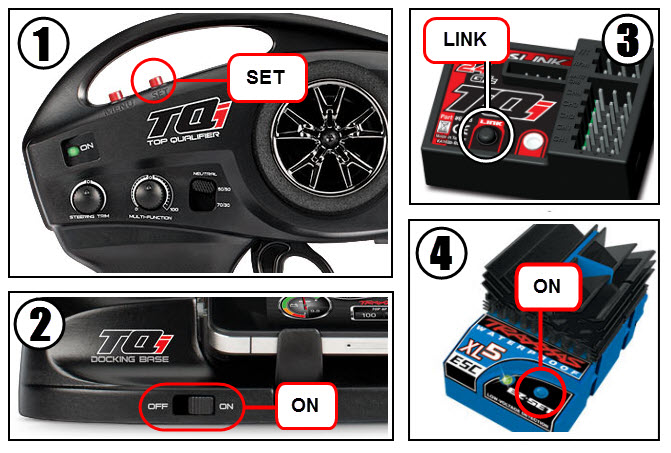
Binding Procedure Steps
Follow these steps to bind your RC transmitter and receiver. Start by turning on the transmitter. Next, connect the receiver to a power source. Press the binding button on the receiver. This creates a connection between the transmitter and receiver.
Once bound, test the controls for proper functioning.
Binding your RC transmitter and receiver is a crucial step in ensuring seamless communication between your remote control and the model. It’s a straightforward process that requires precision and care.
Whether you’re a seasoned hobbyist or a beginner, knowing how to bind these devices correctly can save you from frustration and potential mishaps. Let’s break down the binding procedure into simple, actionable steps that you can follow with ease.
Step 1: Prepare Your Devices
Start by ensuring your transmitter and receiver are compatible. Check the manuals for any specific binding instructions. Have fresh batteries ready, as a weak battery can cause binding issues. Set up a clean workspace, free from distractions, where you can focus on the task at hand.
Step 2: Power Up The Receiver
Connect your receiver to a power source, usually through the battery pack of your RC model. You might notice a blinking LED, indicating it’s ready for binding. Ever had the light refuse to blink? Check your connections and ensure everything is firmly plugged in.
Step 3: Activate Bind Mode On Transmitter
Turn on your transmitter and navigate to the bind setting. This is typically found in the menu system. Select the bind option, and your transmitter will start searching for the receiver. How do you know it’s working? You’ll hear a series of beeps or see an LED indicator.
Step 4: Pair The Transmitter And Receiver
Press and hold the bind button on your receiver while the transmitter is in bind mode. Wait for the LED on the receiver to change from blinking to steady. This indicates a successful connection. Imagine the relief when the LED finally stops blinking, and your transmitter and receiver are in sync.
Step 5: Test The Connection
Once bound, test the connection by moving the controls on your transmitter. Check if the model responds accordingly. If it doesn’t, revisit the binding steps. Ever felt the frustration of nothing happening? Sometimes, it’s just a loose wire or an overlooked step.
Step 6: Secure The Setup
Ensure all connections are tight and secure. Double-check your receiver’s placement to avoid interference. How often have loose parts caused unexpected crashes?
A quick check now can prevent problems later. Binding your RC transmitter and receiver doesn’t have to be daunting. With these simple steps, you’re equipped to ensure your devices communicate effectively.
Have you ever struggled with binding? What helped you troubleshoot the issue? Share your thoughts below!
Testing The Connection
Easily connect your RC transmitter and receiver by ensuring they are on the same frequency. Follow simple binding steps for a seamless experience. Adjust settings as needed to ensure smooth communication between devices.
Testing the connection between your RC transmitter and receiver is crucial. Ensuring they’re communicating correctly means your RC model will respond accurately to your commands. Without a proper test, you risk unexpected behavior or loss of control. Let’s dive into how you can efficiently test this connection.
Power Up Your Devices
Begin by turning on your transmitter first, followed by the receiver. This sequence helps avoid interference. Ensure both devices have fresh batteries. Weak power can lead to unreliable connections.
Check LED Indicators
Observe the LED lights on both the transmitter and receiver. They usually indicate connection status. A steady light often means a successful bind. If you see blinking or unusual colors, it might signal a problem.
Perform A Range Test
Walk away from your receiver while operating the transmitter. Keep an eye on the model’s responsiveness. Does it move as expected? A good range test ensures the transmitter can command the receiver over a distance.
Test Movement Controls
Start with basic movements like left, right, forward, and backward. Each command should result in immediate action from your model. If there’s a delay, you may need to re-bind or check for interference.
Adjust Antennas
Sometimes, adjusting the antennas can improve the connection. Ensure they’re aligned properly. This simple tweak can enhance signal strength and reduce dropouts.
Evaluate In Different Environments
Try testing in various locations. Indoor and outdoor settings can affect signal quality. Understanding how your setup behaves in different environments can prepare you for real-world use.
Document Any Issues
Keep a log of any irregularities you encounter during testing. This helps in troubleshooting and provides valuable information if you need expert assistance later.
Reflect On Your Experience
Think about your testing process. Was there something unexpected? Maybe a surprising challenge or a quick fix you discovered? Sharing these insights can help others facing similar issues.
Remember, a thorough connection test is not just about functionality—it’s about safety. Would you trust your model to perform accurately when it matters most? Taking the time to test can make all the difference.

Credit: www.youtube.com
Troubleshooting Common Issues
Binding RC transmitters and receivers often involves checking settings and ensuring proper channel matching. Start by turning on the transmitter and receiver, then sync them using the bind button or switch. Ensure both devices have compatible frequencies for seamless communication.
When binding your RC transmitter and receiver, you might encounter a few hiccups. These issues can be frustrating, especially if you’re excited to get your RC vehicle up and running. Let’s dive into some common problems and how you can solve them.
1. Check Battery Levels
Low battery levels are often overlooked but can cause binding issues. Ensure both your transmitter and receiver have fresh batteries or are fully charged. A weak power source can disrupt the connection process, leading to unsuccessful binding attempts.
2. Ensure Proper Distance
Are you too close or too far from your receiver? The optimal distance for binding is typically between 1 to 3 feet. Being too close can cause signal interference, while being too far can weaken the signal, making binding difficult.
3. Confirm Correct Binding Mode
Double-check if your transmitter and receiver are in the correct binding mode. Each brand might have different procedures, so consult your user manual. If your devices aren’t in sync, binding won’t occur, no matter how many times you try.
4. Inspect Antennas
Damaged or improperly positioned antennas can severely impact signal transmission. Inspect the antennas on both the transmitter and receiver for any visible damage. Ensure they are positioned correctly to maintain a strong connection.
5. Firmware Updates
Outdated firmware can create compatibility issues between your transmitter and receiver. Check the manufacturer’s website for any recent updates. Keeping your devices updated ensures they communicate effectively with each other.
6. Verify Channel Settings
Channel settings can be tricky if not configured correctly. Ensure your transmitter and receiver are set to the same channel. Mismatched channels will prevent the devices from binding successfully.
7. Reset And Reattempt
Sometimes, a simple reset can work wonders. Turn off both your transmitter and receiver, then restart the binding process. This can clear any temporary glitches or errors blocking the binding process.
8. Consult Support Or Online Forums
If all else fails, don’t hesitate to seek help. Contact the manufacturer’s support team or visit online forums for advice. Fellow hobbyists often share valuable insights that might just solve your problem.
Have you ever faced a binding issue that seemed unsolvable, only to find it was a simple fix? Share your experiences and let others learn from your journey!
Maintaining Your Rc System
Binding your RC transmitter and receiver is essential for smooth operation. Start by turning on both devices. Press the bind button on the receiver. Follow with the bind button on the transmitter. Wait for a steady light indicating a successful connection.
Enjoy seamless control over your RC system.
Maintaining your RC system is crucial for optimal performance and longevity. Whether you’re a seasoned RC enthusiast or a beginner, understanding the importance of regular maintenance can make a significant difference. It’s not just about ensuring your transmitter and receiver work seamlessly; it’s about enhancing your overall RC experience.
Regular Checks And Cleanings
Ensure your RC transmitter and receiver are free from dust and dirt. These particles can interfere with signals, leading to poor performance. Regularly inspect connectors and wires for any damage. A quick clean with a soft brush or compressed air can work wonders.
Battery Care
Your RC system’s batteries are its lifeline. Always check battery levels before heading out for a session. Consider investing in rechargeable batteries for more consistent performance. Avoid leaving batteries in the transmitter for extended periods when not in use to prevent corrosion.
Software Updates
Manufacturers often release updates to improve functionality or fix bugs. Check if your transmitter or receiver has firmware that can be updated. Updating software is simple and can enhance your RC system’s efficiency. Ask yourself: when was the last time you checked for updates?
Connection Testing
Periodically test the connection between your transmitter and receiver. This ensures everything is in working order before you take your RC model for a spin.
A simple range test can help you identify any signal issues early. Imagine the frustration of losing control mid-flight or mid-race due to signal loss—prevention is key.
Environmental Considerations
Consider where you operate your RC system. Extreme temperatures or moisture can affect performance. Store your RC equipment in a cool, dry place to avoid damage. Reflect on past experiences; have you ever had an RC mishap due to environmental factors?
Keeping Spare Parts
Having spare parts on hand can save the day. Stock up on common items like antennas, wires, and connectors. Think of it like keeping an emergency kit. It’s better to be prepared than face downtime waiting for replacements.
Maintaining your RC system doesn’t have to be a chore. With regular checks and a proactive approach, you’ll enjoy smoother sessions and fewer interruptions. What steps will you take today to ensure your RC system stays in tip-top shape?

Credit: www.amazon.com
Frequently Asked Questions
How Do I Bind An Rc Transmitter?
To bind an RC transmitter, first ensure both the transmitter and receiver are powered on. Press the bind button on the receiver, then follow the manufacturer’s instructions to initiate the binding process on the transmitter. Once completed, the transmitter and receiver should communicate seamlessly.
What Is The Purpose Of Binding Rc Devices?
Binding RC devices establishes a secure connection between the transmitter and receiver, ensuring reliable communication. This process prevents interference from other devices and optimizes control signals for precise operation. Binding is essential for maintaining consistent performance in RC models.
Can I Bind Multiple Receivers To One Transmitter?
Yes, many modern RC transmitters allow binding multiple receivers. This feature is useful for controlling different models using a single transmitter. Follow the instructions provided by your transmitter’s manufacturer to bind additional receivers while ensuring compatibility and effective communication.
Why Is My Rc Transmitter Not Binding?
If your RC transmitter isn’t binding, check the battery levels in both devices. Ensure they are powered on and in binding mode. Verify that you’re following the correct binding procedure from the manufacturer. Interference or mismatched frequencies may also hinder the binding process.
Conclusion
Binding your RC transmitter and receiver can seem tricky at first. But with patience, it’s manageable. Always follow the manual for your specific model. Ensure all devices are powered off before starting. Use the bind button or switch, as directed.
Wait for the lights to indicate successful binding. Test your setup to confirm the connection works. Practice makes perfect, so don’t rush. Troubleshoot if any issues arise. Understanding these steps ensures a seamless RC experience. Enjoy the thrill of controlling your RC vehicle with confidence.
Keep exploring and improving your skills. Happy flying or driving!