How to Make a Diy Faux Living Plant Wall: Stunning Guide
Imagine transforming your space into a lush, green oasis without the hassle of watering or worrying about sunlight. A DIY faux living plant wall might be just what you need.
It’s a creative and cost-effective way to bring the beauty of nature indoors, all while showcasing your personal style. You don’t need a green thumb or a big budget; just a few materials and some creativity can turn your wall into a striking focal point.
In this guide, you’ll discover easy steps and smart tips to create your own stunning plant wall. Get ready to impress your friends and enjoy the calming ambiance of a green space, minus the maintenance. Let’s dive in and unleash your inner designer!
Benefits Of Faux Plant Walls
Transform any space with a DIY faux living plant wall, offering charm and freshness without maintenance. Enjoy the lasting greenery and vibrant visuals, perfect for enhancing home or office decor. Create an inviting atmosphere with your own crafted masterpiece, bringing nature indoors effortlessly.
Creating a DIY faux living plant wall can transform any space into a refreshing oasis without the hassle of maintenance. Faux plant walls have become increasingly popular due to their versatility and aesthetic appeal.
They offer numerous benefits that go beyond just beauty. If you’re contemplating whether to add one to your home or office, understanding these advantages might help you decide.
Low Maintenance
A faux plant wall requires no watering, trimming, or feeding. This is a huge time-saver for anyone with a busy lifestyle. You get the lush green look without the constant upkeep.
Allergen-free
Live plants can trigger allergies for some people. Faux plants provide the same visual delight without the sneezes. They are perfect for creating a serene environment for everyone.
Cost-effective
While there is an initial investment, faux plant walls do not need replacement or regular care. Over time, this can save you money compared to maintaining real plants. Plus, they stay vibrant and never wither.
Versatility In Design
Faux plant walls can be customized to fit any space or style. You can mix different types of faux plants to create a unique pattern. Change the layout whenever you feel like refreshing your space.
Long-lasting Beauty
Real plants can suffer from pests, seasonal changes, and age. Faux plants remain unchanged and beautiful all year round. Your space will always look fresh and lively.
Eco-friendly Options
Some faux plants are made from recycled materials. This can reduce waste and lessen environmental impact. Choosing eco-friendly faux options supports sustainability.
Imagine a world where you can enjoy the lushness of a garden without any of the work. Have you ever thought about what you’d do with the time saved?
With faux plant walls, you can focus on what truly matters to you while still enjoying a beautiful, green space.
Credit: www.decoist.com
Choosing The Right Location
Select a bright spot for your faux living plant wall to thrive. Ensure the area is free from moisture. This prevents damage to the materials. A well-chosen location enhances the visual appeal and ensures longevity.
Creating a DIY faux living plant wall can transform any space, adding a burst of nature’s beauty without the upkeep. But the success of your project hinges on one crucial decision: choosing the right location. This choice not only affects the aesthetics but also the practicality and durability of your faux plant wall.
When considering where to place your plant wall, think about foot traffic, lighting, and the wall’s purpose. Is it meant to be a focal point or a subtle backdrop? Selecting the perfect spot can amplify the impact of your decor.
Assess The Lighting Conditions
Light plays a vital role in making your faux plant wall look realistic. Even though they are faux, placing them in well-lit areas enhances their appearance.
Natural light will give your greenery a vibrant look, mimicking the glow of living plants. If natural light is scarce, don’t worry. You can use artificial lighting to highlight your wall. Choose LED lights that mimic daylight for the best effect.
Evaluate The Wall’s Purpose
Consider what you want your plant wall to achieve. Is it a statement piece to draw attention, or a subtle addition to complement existing decor?
If it’s a focal point, place it where it can be admired, like behind a sofa or in a dining area. For a more understated look, consider placing it in a hallway or stairwell. This way, it enhances the space without overwhelming it.
Consider Foot Traffic And Accessibility
Think about how often the area is used. High-traffic areas require sturdier installations to avoid damage. Ensure your faux plants are securely attached to withstand bumps and touches.
Also, consider accessibility for cleaning or any future changes. A location that’s easy to reach will save you hassle down the line.
Account For Temperature And Humidity
Even faux plants can be affected by extreme conditions. Avoid placing your wall near heating vents or windows that get intense sunlight, as this can fade the colors.
Similarly, areas with high humidity might cause adhesives to weaken. Keep these factors in mind to maintain your faux plant wall’s appeal over time.
Personal Experience: Lessons Learned
Once, I placed a faux plant wall in my kitchen, thinking it would bring a touch of nature to my cooking space. However, the proximity to the stove meant constant exposure to heat and steam, causing the adhesive to fail.
Relocating it to a well-lit but cooler corner of my living room not only solved the problem but also made it a conversation starter.
Have you considered how your space’s conditions might affect your faux plant wall? Choosing wisely can save you from unexpected surprises.
Materials And Tools Needed
Creating a DIY faux living plant wall transforms any space instantly. Knowing the right materials and tools ensures success. Gather essential supplies and consider optional enhancements. These will enhance your faux plant wall and make it unique.
Essential Supplies
Start with a sturdy wooden frame or panel. This forms the base. Use artificial greenery that looks real. Choose a variety of plants for a natural look. Secure plants with floral wire or hot glue. Use wire cutters and scissors for easy trimming.
Pick a strong adhesive or mounting tape. It must hold the frame securely. Ensure you have measuring tape and a level. These tools keep your wall straight and even. Safety goggles protect your eyes during the process.
Optional Enhancements
Add LED fairy lights for a magical touch. They create a warm glow. Use decorative moss and small pebbles. These add texture and depth. Incorporate miniature faux flowers for pops of color. Choose different flower types for variety.
Consider a backdrop fabric to enhance the look. It adds color and dimension. Use a staple gun to secure fabric. This keeps everything in place. Hang lightweight decorative elements for added interest. Ensure all additions match your style.
Design Planning
Create a stunning faux living plant wall with a few simple steps. Gather faux plants, a sturdy frame, and attach them securely. Arrange plants to mimic a natural look, adding depth and variety for an eye-catching design.
Creating a stunning DIY faux living plant wall begins with thoughtful design planning. This crucial step sets the foundation for a visually appealing and harmonious display.
Without a solid plan, your plant wall might end up looking cluttered or mismatched. Let’s dive into how you can select plant styles, coordinate colors, and create an exciting layout for your faux plant masterpiece.
Selecting Plant Styles
Choosing the right plant styles is like curating an art gallery. Each piece should complement the others to create a cohesive look. Do you prefer the elegance of ferns or the boldness of succulents?
Mixing different styles can add depth and texture. Think about how the shapes and sizes of the plants will work together. Remember that you’re not limited by what grows in your region. Explore various faux options like trailing vines or tropical leaves.
Imagine how they would look hanging on your wall. Consider the vibe you want to create—modern, rustic, or tropical—and pick plants that align with that vision.
Color Coordination
Color coordination is the secret sauce to an eye-catching plant wall. It’s more than just picking your favorite colors. How will the hues interact with the existing decor?
Use color theory to balance your palette. You might opt for greens with hints of purple or white to add contrast. Consider the lighting in your space. Will natural light enhance the colors, or will you need to add lighting for a vibrant pop? Think about how the colors make you feel.
Do they evoke calmness, energy, or creativity? You can even play with seasonal themes, changing the colors as the year progresses.
Creating A Layout
Designing a layout is where your creativity shines. Start by measuring your wall space. How much room do you have to work with?
A good tip is to sketch your design on paper before starting. Consider the balance between symmetry and asymmetry. A symmetrical layout can offer a sense of order, while an asymmetrical design might feel more dynamic and organic. How will your plants be arranged? In rows, clusters, or a random pattern?
Think of your plant wall as a story. Where does your eye start and where does it end? You could create a focal point with a larger plant or a unique shape. How does the layout guide viewers through your visual narrative?
By focusing on design planning, you ensure your DIY faux living plant wall is not just a decoration but an expression of creativity and style. Ready to transform your space with a botanical masterpiece?
Preparing The Wall
Creating a DIY faux living plant wall starts with preparing the wall. Proper preparation ensures your faux plants look amazing and stay secure. Let’s dive into the crucial steps you need to follow for a perfect setup.
Surface Cleaning
Begin by cleaning the wall surface. Dust and dirt can affect adhesive quality. Use a damp cloth or a mild cleanser. Wipe the wall thoroughly. Ensure it dries completely. A clean surface is essential for a strong bond.
Measuring And Marking
Next, measure your wall space. Determine the area your faux plants will cover. Use a measuring tape for accuracy. Mark the dimensions with a pencil. These marks will guide your installation. Keep your measurements precise.
Plan your plant placement within these marks. This ensures a balanced look. Check your measurements twice. A small error can affect the final appearance.
Building The Frame
Creating a faux living plant wall begins with crafting a sturdy frame. Choose lightweight materials like wood or metal. Ensure the frame supports the weight of artificial plants securely, offering a realistic appearance.
Creating a stunning DIY faux living plant wall begins with building a sturdy frame. This foundational step is crucial because the frame supports the entire structure.
Without a solid frame, your plant wall might not last or look as appealing. Let’s dive into the nuts and bolts of frame construction and mounting techniques, so you can confidently bring your green vision to life.
Frame Construction
Begin by deciding the size and shape of your plant wall. Whether you want a small accent piece or a large statement wall, the frame must match your vision. Use lightweight materials like pine or cedar, which are easy to cut and handle. Measure twice and cut once to ensure precision.
You can use a simple hand saw or a miter saw for more accuracy. Once you have your pieces, assemble them using wood glue and screws for added stability. It’s like putting together a giant puzzle—each piece must fit perfectly to hold everything in place. Do you want to add a personal touch?
Consider painting or staining the frame to match your home decor. This is where your creativity can shine, transforming a simple frame into a stylish feature.
Mounting Techniques
Mounting your frame securely is just as important as building it. If it’s not mounted properly, your plant wall could come crashing down. Use wall anchors that can support the weight of the frame and plants. Find the studs in your wall for the most secure attachment.
If you’ve ever hung a heavy picture or mirror, you already have a head start. Use a stud finder to locate them and mark the spots where you’ll drill. For renters or those concerned about wall damage, consider using adhesive hooks or strips. These alternatives can support lighter frames without leaving permanent marks. Which method suits your living situation best?
Building a faux living plant wall is not just a task; it’s an opportunity to enhance your space with a touch of nature. Take the time to create a strong frame and mount it correctly. This care ensures your plant wall remains a vibrant part of your home for years to come.
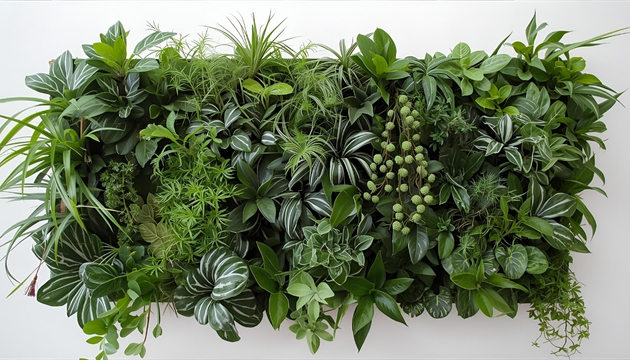
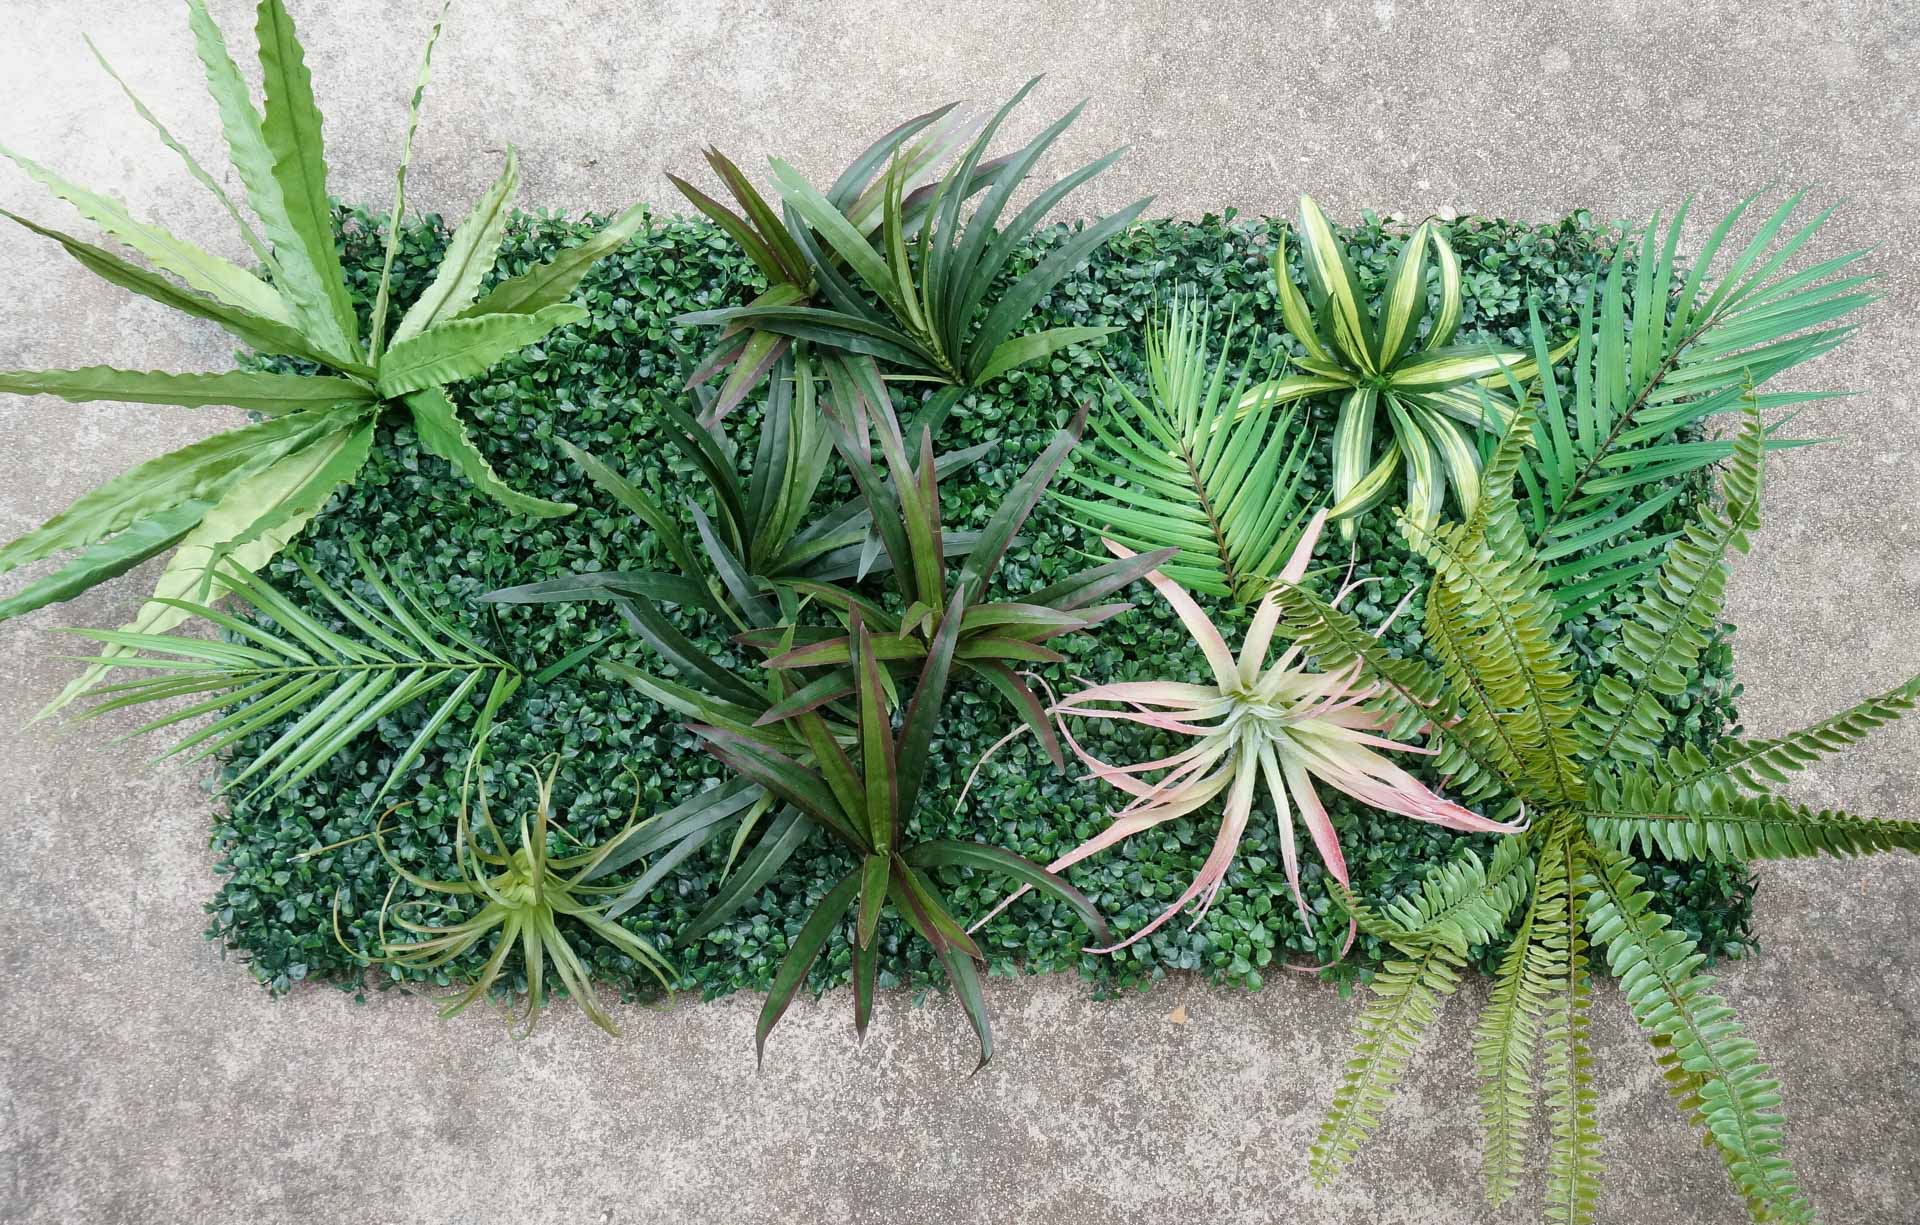
Arranging Faux Plants
Creating a faux living plant wall brings life to any space. Arranging faux plants carefully enhances the realistic effect. The right arrangement can transform your wall into a lush paradise.
This process involves creativity and some strategic planning. Let’s dive into the essential techniques for a stunning display.
Layering Techniques
Layering adds depth to your plant wall. Start with larger plants as the base. They create a solid foundation. Use medium-sized plants for the next layer. These add texture and fill gaps.
Finally, integrate smaller plants at the top. This creates a natural cascading effect. Mix different shades of green for a realistic look. Combine plants with varying leaf shapes and sizes. This diversity mimics nature’s beauty.
Securing Plants
Securing your faux plants is crucial for durability. Use a sturdy backing like a wire grid. Attach each plant securely with zip ties. Ensure that the ties are tight but not damaging. This prevents plants from falling or shifting. You can also use adhesive hooks for added security.
Arrange plants in a balanced manner. Avoid overcrowding to maintain a natural look. Check each plant’s position regularly. Adjust as needed to keep the arrangement fresh.
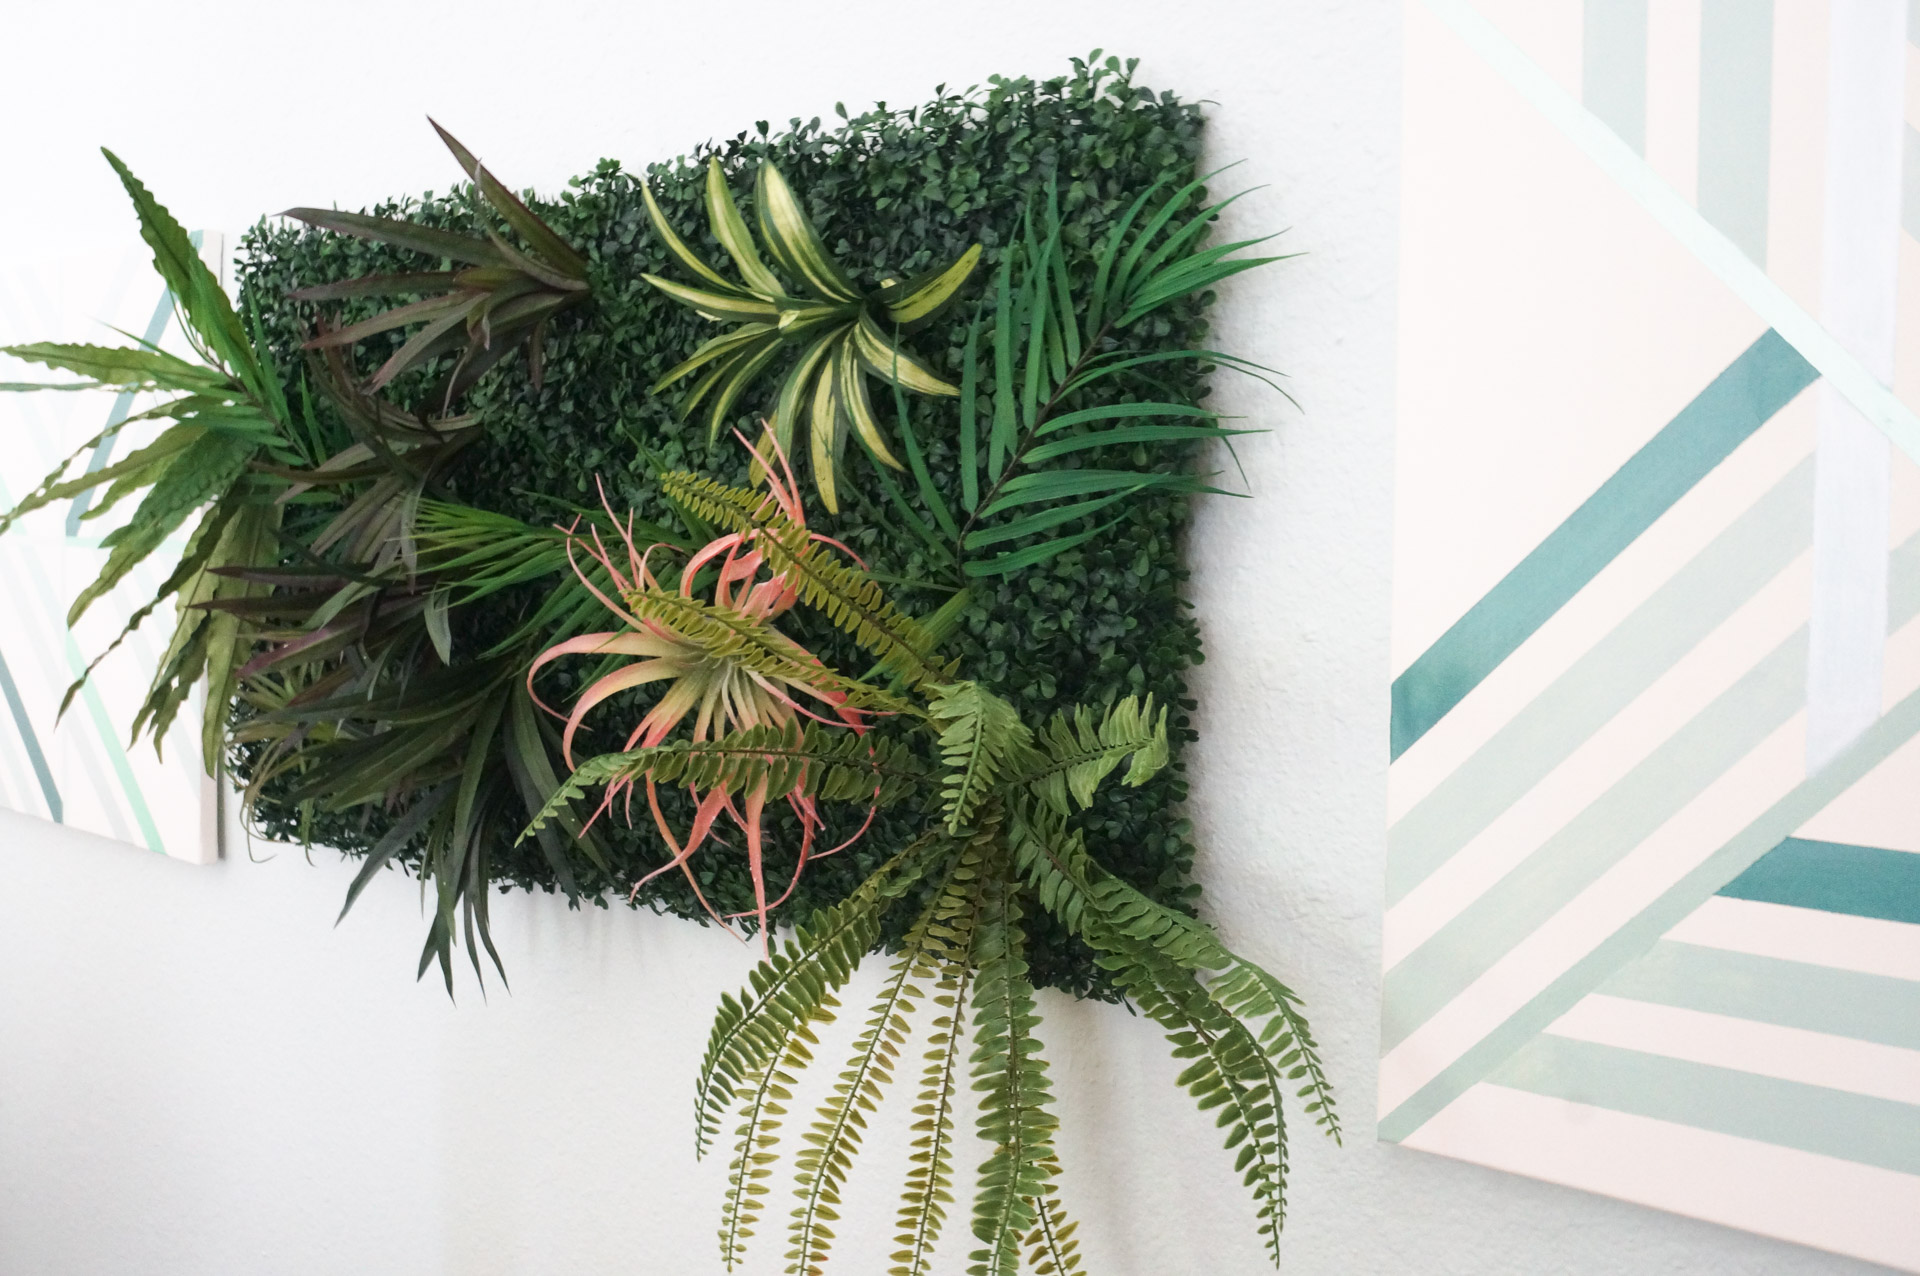
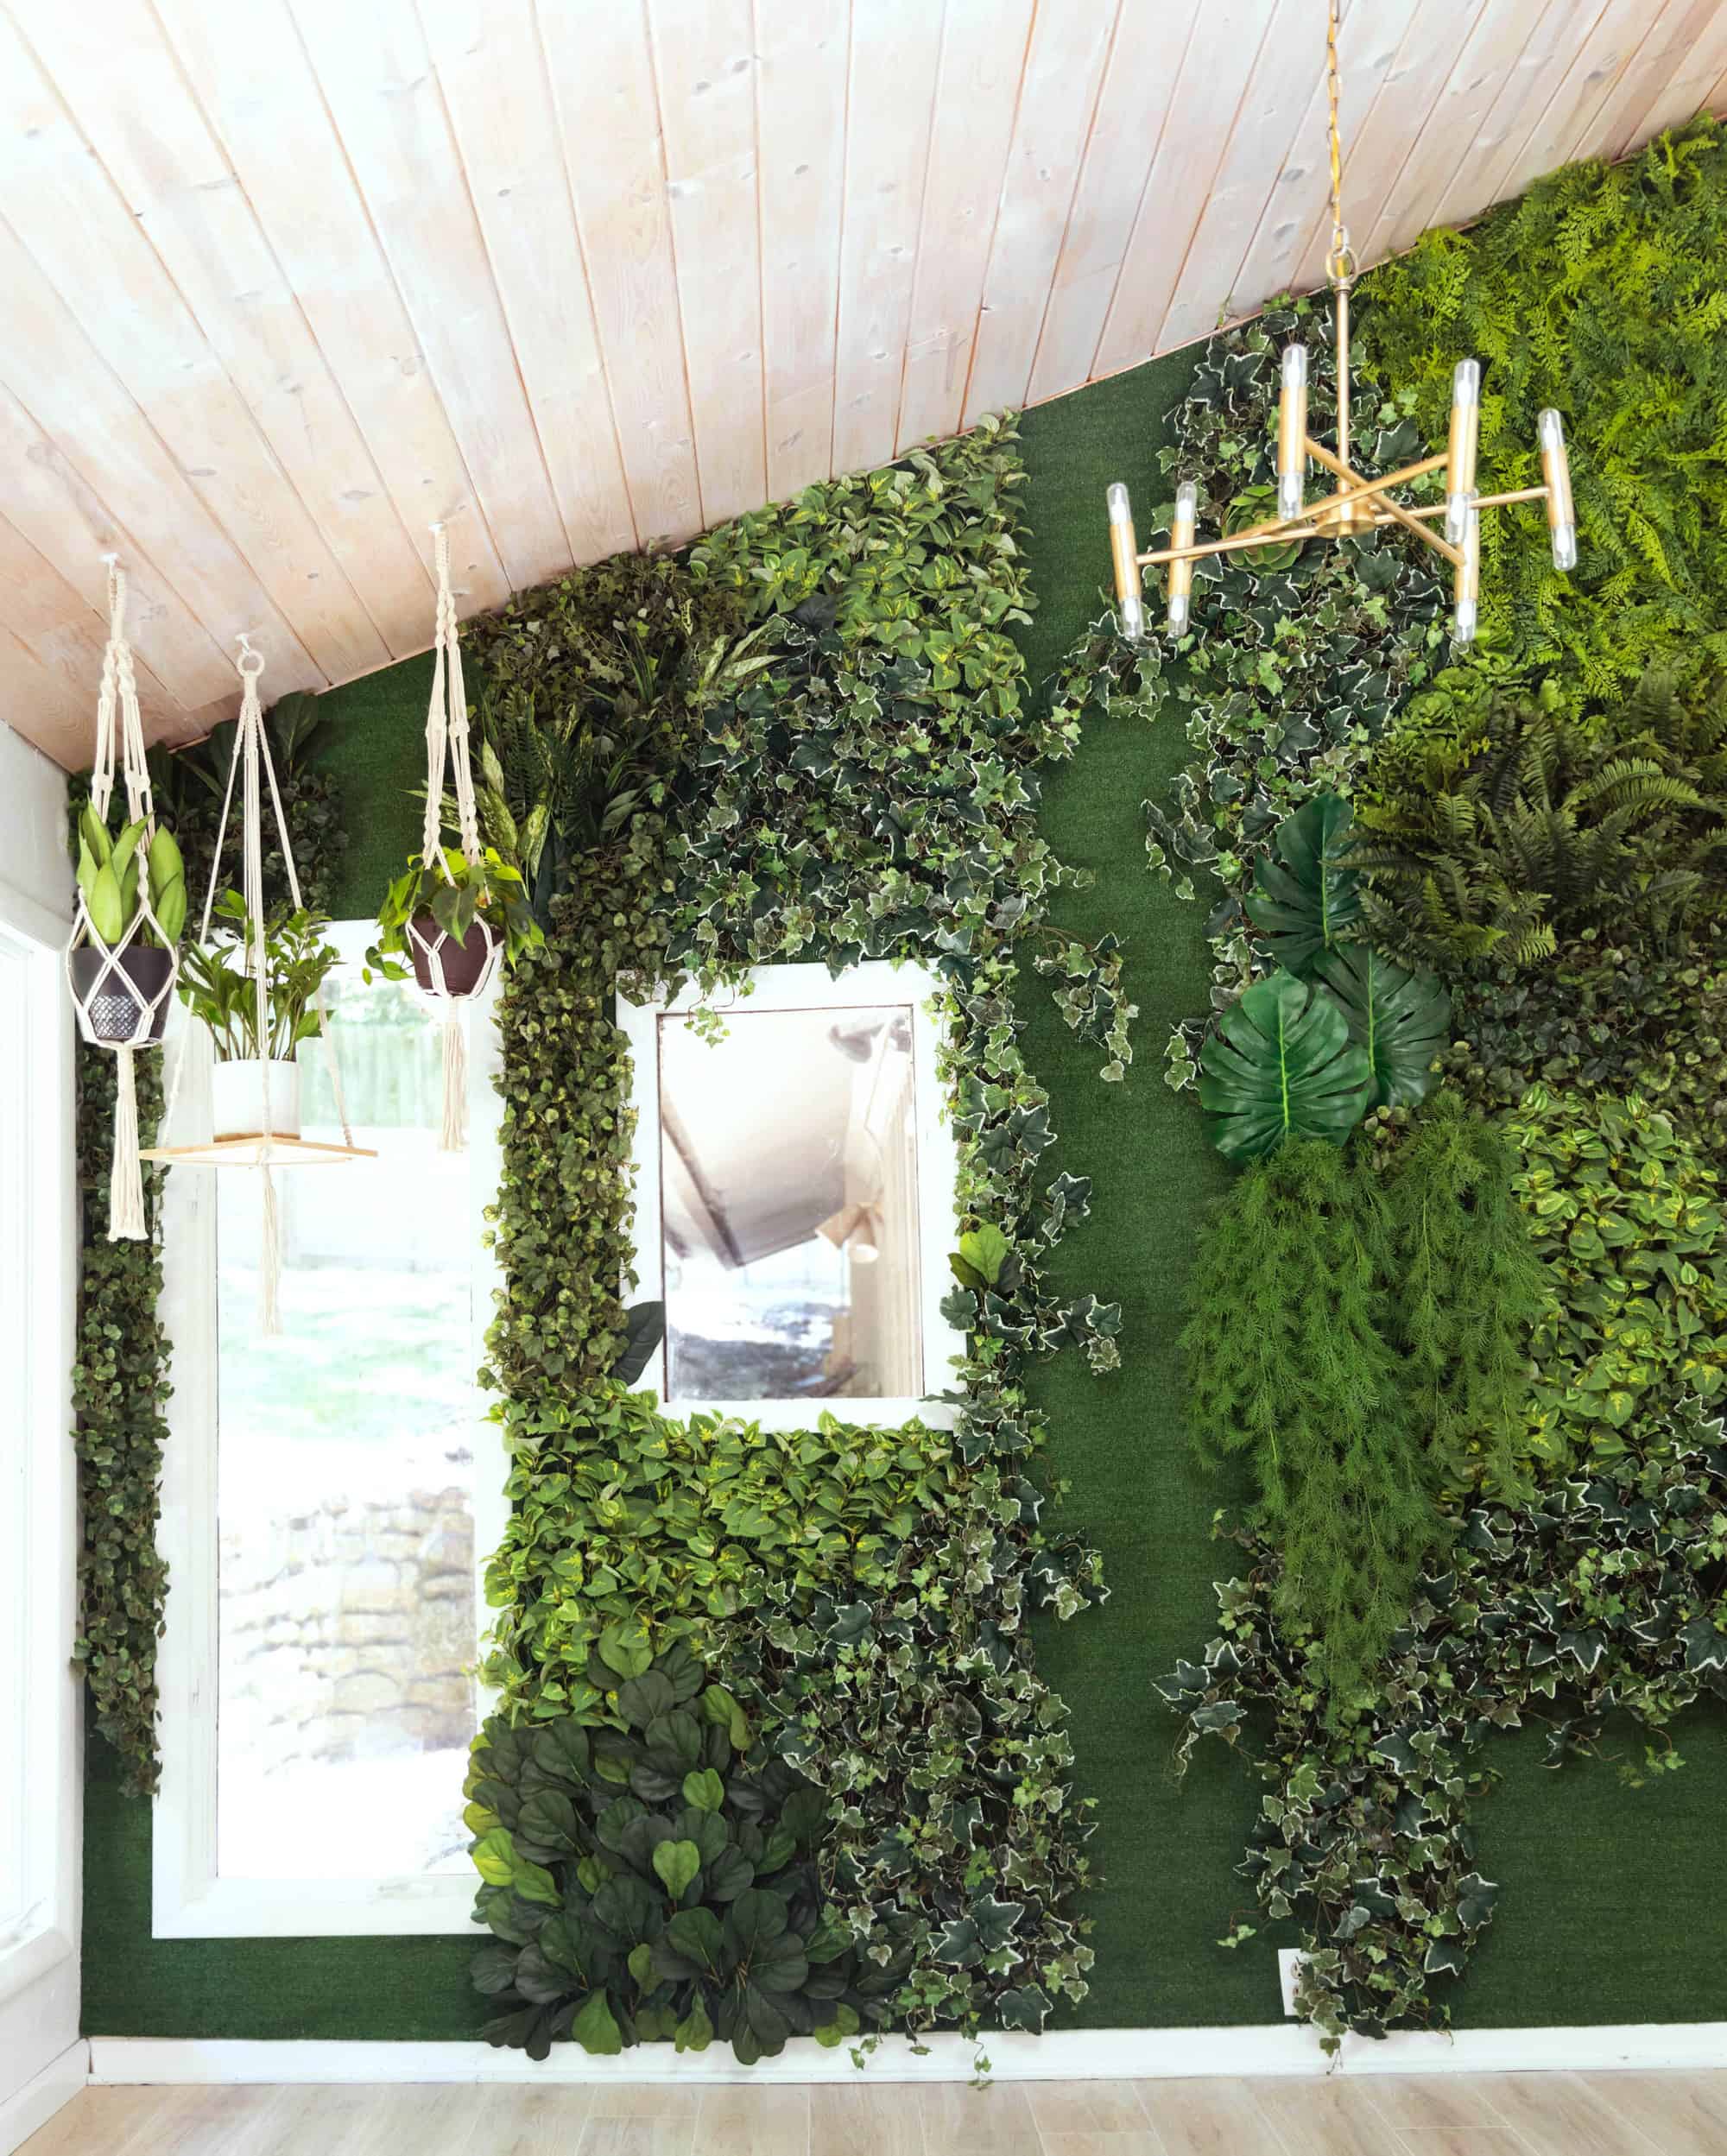
Adding Decorative Elements
Elevate your space with a DIY faux living plant wall. Use decorative elements like colorful pots and textured backdrops. Arrange artificial plants creatively to mimic nature’s beauty without the maintenance.
Transforming a plain wall into a stunning faux living plant wall doesn’t stop at arranging the greenery. Adding decorative elements can elevate the wall from charming to truly captivating.
Your creative touch will make the wall uniquely yours, and the right enhancements can make all the difference. Let’s explore some engaging ways to add those extra touches.
Incorporating Lights
Lights can add a magical touch to your faux plant wall. String lights or fairy lights can create a warm ambiance and draw attention to your beautiful creation. Imagine the soft glow highlighting your plants during an evening gathering.
Consider using LED strips to outline the frame of your wall. This not only adds a modern flair but also highlights the contours of your plants. Battery-operated options keep things simple, avoiding messy wires. Think about the atmosphere you want to create.
Do you prefer a soft, romantic glow, or something more vibrant and festive? Your choice of lighting will set the mood for the entire space.
Using Accents
Accents like decorative pots, small sculptures, or even mirrors can add depth and interest. These elements break up the greenery and can reflect your personal style. Adding small bird figurines or butterflies can give a whimsical feel. These subtle touches can make your faux plant wall feel more lively and dynamic.
Consider seasonal accents to keep things fresh. Little pumpkins in autumn or snowflakes in winter can make your wall a year-round delight. What accents speak to you and your space?
A faux living plant wall is a blank canvas. It’s your creativity that brings it to life. The decorative elements you choose tell a story, making your wall not just a decoration but a conversation starter.
Maintaining Your Faux Wall
Create a stunning faux living plant wall with simple tools and materials. Arrange artificial plants creatively for a vibrant look. Regularly dust and rearrange plants to maintain freshness and appeal.
Creating a faux living plant wall is a fantastic way to bring greenery into your home without the need for constant care. However, maintaining the beauty and freshness of your faux wall requires some attention.
Keeping it clean and replacing elements when needed will ensure it continues to look vibrant and realistic. Let’s explore some practical tips to keep your faux plant wall looking its best.
Cleaning Tips
Dust can accumulate on your faux plants over time, dulling their vibrant look. Use a soft, damp cloth to gently wipe the leaves. This helps maintain their shine and color.
Consider using a feather duster for quick touch-ups. It’s perfect for reaching tight spaces between the faux plants. If your wall is large, a handheld vacuum with a brush attachment can be very effective.
Avoid using harsh chemicals. These can damage the material of your faux plants. Instead, opt for a mild soap solution if needed.
Replacing Elements
Occasionally, some elements of your faux wall might need replacing. Maybe a leaf falls off, or a section loses its color. You don’t have to redo the entire wall. Just swap out the affected pieces. Keep extra materials on hand. This makes it easy to replace any elements that may get damaged.
A small storage box can keep these extras organized and easily accessible. Think of your faux wall as a dynamic piece of art. You can update it with new elements to refresh the look. This is a great way to reflect seasonal changes or personal style updates. Maintaining your faux plant wall doesn’t have to be a chore.
With a bit of regular care, it can remain a stunning focal point in your home. What’s one small change you can make today to enhance the beauty of your space?
Credit: www.decoist.com
Credit: abeautifulmess.com
FAQ How to Make a Diy Faux Living Plant Wall
What Materials Do I Need For A Faux Plant Wall?
To create a DIY faux living plant wall, gather faux plants, a wooden frame, wire mesh, and adhesive. Choose a variety of plants to mimic a natural look. Use strong adhesive or zip ties to attach the plants securely to the mesh.
Consider adding decorative elements for a personalized touch.
How Do I Attach Faux Plants To The Wall?
Start by securing wire mesh inside the wooden frame. Use adhesive or zip ties to attach the faux plants to the mesh. Arrange the plants to cover the mesh entirely. Ensure each plant is firmly attached to avoid falling. Regularly check and adjust the arrangement for a natural appearance.
Can I Customize My Faux Plant Wall Design?
Yes, you can customize your faux plant wall design by choosing different plant types and colors. Add decorative elements like fairy lights or small ornaments. Arrange the plants in patterns or layers for depth. Personalize the frame with paint or stain to match your decor style.
How Do I Maintain A Faux Plant Wall?
Maintaining a faux plant wall is simple. Dust the plants regularly with a soft cloth or duster. Inspect for loose attachments and re-secure if needed. Avoid direct sunlight to prevent fading. Occasionally rearrange the plants for a fresh look. Faux plants require no watering or pruning.
Conclusion
Creating a DIY faux living plant wall is simple and rewarding. It adds greenery without the need for constant care. Perfect for busy lifestyles. You save time and still enjoy nature. This project brings life to any space. A touch of green brightens your room instantly.
Follow the steps and transform your walls today. Use this guide to start your creative journey. Let your imagination flow. Make your home a green sanctuary with ease. It’s affordable, fun, and refreshing. Enjoy your new vibrant space.