How to Make a Helicopter for School Project: Step-by-Step Guide
Are you ready to impress your classmates and teacher with a unique school project? Building a helicopter might sound like a daunting task, but with the right guidance, you can create an amazing model that will capture everyone’s attention.
Imagine the thrill of showcasing your creativity and engineering skills. This guide is designed to help you craft a helicopter model that is not only educational but also fun to build. You’ll learn simple techniques and gather materials that are easy to find, making the entire process straightforward and enjoyable.
Dive into this article, and you’ll discover how to turn a challenging idea into a rewarding project, all while boosting your confidence and standing out in your class.

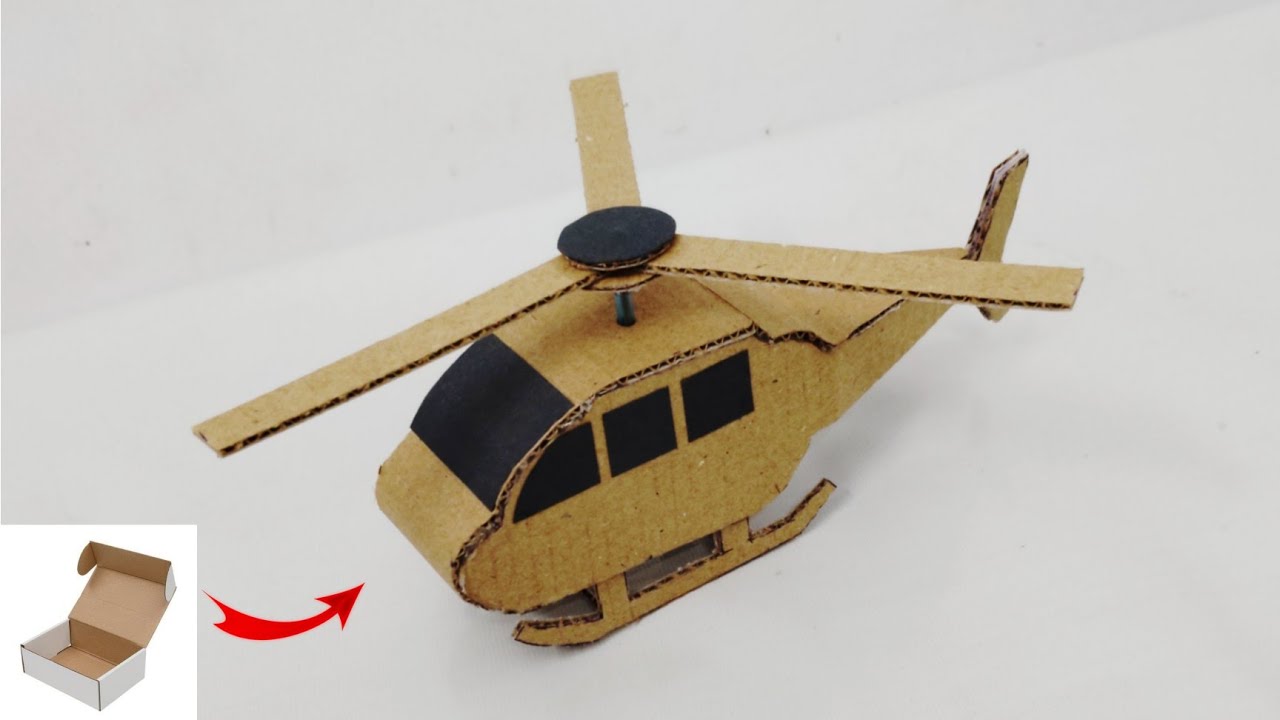
Credit: www.pinterest.com
Materials Needed
Gather cardboard, scissors, and glue to start building your helicopter. Use plastic straws and rubber bands for the rotor blades. Decorate with markers or paints for a colorful finish.
Creating a helicopter for a school project can be a fun and educational experience. Before you dive into the building process, it’s crucial to gather all the materials you’ll need.
Having the right supplies on hand not only saves time but also boosts your creativity as you experiment with different designs. So, what exactly do you need to get started?
Cardboard Or Balsa Wood
Cardboard is a versatile material that’s easy to work with, especially for beginners. It can be cut into various shapes and glued together effortlessly.
If you’re feeling more adventurous or want a more durable model, balsa wood is an excellent alternative. It’s lightweight, easy to carve, and adds a professional touch to your helicopter.
Scissors And Cutter
A good pair of scissors and a precision cutter are essential tools for cutting your cardboard or balsa wood. Make sure they are sharp and comfortable to handle. This ensures clean cuts, which are crucial for a neat assembly. Always prioritize safety and supervise young children during cutting.
Glue And Tape
You’ll need a strong adhesive to hold your helicopter parts together. White glue or hot glue works well with cardboard, while wood glue is more suitable for balsa wood.
Additionally, keep some tape handy for temporary holds or adjustments. It’s always a good idea to test your glue on a scrap piece to ensure it dries clear and strong.
Rubber Bands
Rubber bands are vital if you plan to make a functional model. They can be used to create the rotor mechanism, allowing your helicopter blades to spin. Choose rubber bands that are flexible yet strong enough to handle tension. Experiment with different sizes to find the perfect fit for your design.
Pencils And Ruler
Precision is key in constructing a model helicopter. A pencil and ruler will help you draw accurate measurements and guidelines. This ensures each part fits together perfectly. Remember, attention to detail can make or break your project.
Plastic Propeller Or Diy Rotor Blades
You can purchase a small plastic propeller from a hobby store or craft your own rotor blades from cardboard or balsa wood. If making your own, consider the aerodynamics to ensure they can spin effectively. Balancing the rotor blades is crucial for stability.
Decorative Materials
Once your helicopter is assembled, make it unique with some decorative materials. Paint, stickers, or markers can add a personal touch to your project. Encourage creativity and let your imagination take flight. How will you make your helicopter stand out?
Gathering these materials is the first step in your helicopter-building journey. With the right supplies, you’re well on your way to creating a project that impresses not just on looks but on functionality too. Ready to take off on this exciting school project?
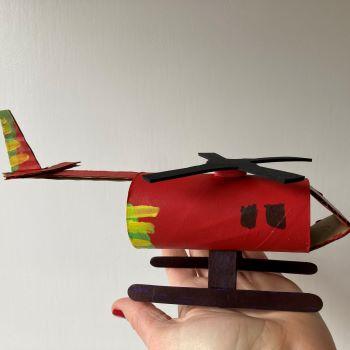
Credit: www.londonsairambulance.org.uk
Choosing The Right Design
Creating a helicopter for a school project involves selecting the right design. Focus on simplicity and balance. Ensure your design includes basic elements like rotors and a sturdy body. Use lightweight materials to enhance lift and stability. This approach makes the project achievable and fun.
Choosing the right design for your school project helicopter can make all the difference in how successful and enjoyable your project turns out to be.
With so many design options available, it’s essential to select one that matches your skill level and resources. A well-chosen design can not only make the building process smoother but also enhance the helicopter’s performance.
Understanding Basic Helicopter Designs
When selecting a design, start by understanding the basic types of helicopters you can build. Simple models might include a basic rotor system and a lightweight body. More advanced designs could incorporate a tail rotor or intricate landing gear.
Ask yourself what you want your helicopter to achieve. Is it just for display, or do you want it to fly? Your choice will guide the materials and techniques you use.
Assessing Your Skill Level
Consider how comfortable you are with building projects. If you’re new to crafting, opt for a straightforward design. Look for kits or tutorials that guide you through step-by-step instructions. If you have more experience, challenge yourself with a complex design.
Remember, the goal is to learn and enjoy the process, not just to complete the project.
Exploring Material Options
The materials you choose can significantly impact your helicopter’s design. Lightweight materials like balsa wood or foam are excellent for flying models. For a static display, cardboard or recycled materials might suffice.
Think about what you have access to and what fits your budget. Are there everyday materials you can repurpose?
Balancing Functionality And Aesthetics
While functionality is crucial, aesthetics shouldn’t be ignored. A well-designed helicopter should also look appealing. Decide how much you want to focus on the helicopter’s appearance versus its ability to function.
Paint, stickers, or additional design elements can enhance its look. How much time are you willing to invest in making it look great?
Testing And Iterating Your Design
Once you’ve chosen your design, be open to testing and making changes. You might find that some aspects of your initial design don’t work as expected. Don’t hesitate to modify parts of your helicopter. Learning from trial and error can provide invaluable lessons. How can you improve on your original idea to make your helicopter even better?
Selecting the right design is a crucial step in your helicopter project. By considering these factors, you set yourself up for a rewarding and educational experience. What kind of helicopter will you create?
Creating The Helicopter Frame
Building a helicopter for a school project is exciting. The frame is its backbone. It’s the part that holds everything together. Crafting a sturdy frame is essential. It ensures your helicopter functions well. Let’s explore how to create it.
Gathering Materials
Start with basic materials. Gather cardboard, glue, and scissors. Cardboard is lightweight yet strong. It’s ideal for the helicopter frame. Ensure you have enough for the entire structure.
Designing The Frame
Sketch a simple design. Draw the body shape on paper. Keep it proportional. This helps in cutting the cardboard accurately. Simplicity is key for beginners.
Cutting The Cardboard
Use scissors to cut the cardboard. Follow your design carefully. Cut pieces for the body and rotor blades. Precision in cutting is crucial. It affects the frame’s stability.
Assembling The Parts
Start assembling the parts. Begin with the body. Use glue to join pieces. Ensure each part fits well. Let the glue dry properly. This step gives strength to the frame.
Adding Support
Add support beams inside the frame. Use extra cardboard strips. Glue them across the body. They add rigidity. Prevent bending or breaking during use.
Final Touches
Inspect the frame for any gaps. Apply extra glue where needed. Check for loose parts. Ensure everything is secure. Your helicopter frame is now complete.
Building The Rotor Blades
Creating rotor blades is a fun part of making a helicopter. They are crucial for the helicopter’s lift and movement. Building them correctly ensures your project functions well and looks impressive.
Step 1: Gather Materials
Collect materials like lightweight cardboard, scissors, and a ruler. You also need a pencil and glue. Make sure the cardboard is sturdy yet light.
Step 2: Draw The Blade Shape
Use a pencil to draw the blade outline on the cardboard. Each blade should be the same size and shape. Aim for a rectangle with rounded ends.
Step 3: Cut Out The Blades
Carefully cut along the lines using scissors. Take your time to ensure clean edges. Precision is important for balance.
Step 4: Shape The Blades
Gently bend each blade to form a slight curve. This curve helps with air movement. Be careful not to crease them too much.
Step 5: Assemble The Rotor
Glue the blades to a central hub. Ensure equal spacing between each blade. Let the glue dry completely before proceeding.
Step 6: Test The Balance
Spin the rotor gently to check balance. Adjust the blades if one side dips. Balanced rotors spin smoothly and improve flight.
Assembling The Tail Rotor
Building a school project helicopter involves assembling the tail rotor with precision. Attach the rotor blades securely to ensure stability. This part is crucial for balance and helps the helicopter spin smoothly.
Assembling the tail rotor of your school project helicopter might seem daunting, but it’s a rewarding task that enhances your model’s functionality. A well-constructed tail rotor ensures stability and control, mimicking real helicopter mechanics.
This part of the project allows you to dive into the fascinating world of aerodynamics, offering a hands-on experience in crafting a critical component of flight.
Understanding The Role Of The Tail Rotor
The tail rotor isn’t just for show; it’s crucial for balance. It counteracts the torque produced by the main rotor. Without it, your helicopter would spin uncontrollably. Think of it as the unsung hero in maintaining your helicopter’s flight path.
Gathering The Necessary Materials
Before you start, collect all materials you’ll need:
- – Balsa wood or lightweight plastic for blades
- – A small motor to drive the rotor – Glue or screws to attach components
- – A small shaft or dowel to connect the motor and blades.
Ensure you have all these items ready to avoid interruptions in your assembly process.
Crafting The Tail Rotor Blades
Cut your chosen material into two or more identical blade shapes. Precision is key here; uneven blades lead to wobble. Keep the blades light yet sturdy. Secure them to the small shaft, ensuring they are evenly spaced. This alignment is crucial for smooth rotation.
Attaching The Tail Rotor To The Helicopter
Fix the rotor to the helicopter’s tail using glue or screws. Make sure it’s secure but allows for free rotation. Connect the rotor to the motor, ensuring it can spin without hindrance.
Testing And Adjustments
Once attached, power the motor to test the rotor. Observe its motion—does it spin smoothly? Adjust the alignment if necessary. Consider adding a small weight if balance is an issue. Fine-tuning can make a significant difference in performance.
Reflecting On The Process
What did you learn from assembling the tail rotor? Did it change your understanding of helicopter mechanics? Sharing your experiences can help others facing similar challenges. Engaging with others can provide new insights and improve your project further.
Assembling a tail rotor isn’t just about following steps; it’s about learning through doing. Embrace the challenge and enjoy the process. Your helicopter project is not only a display of creativity but also a testament to your growing technical skills.

Credit: m.youtube.com
Attaching The Motor
Attach the motor securely to the helicopter frame. Ensure it aligns properly for smooth rotor movement. Use screws or glue for a firm hold.
Attaching the motor is a crucial step in building your school project helicopter. This step ensures the helicopter can lift off the ground. Correctly attaching the motor requires precision and care. It plays a big role in the helicopter’s functionality. Follow these steps to secure the motor properly.
Understanding Motor Placement
First, determine the ideal spot for the motor. The motor should be near the center of the helicopter’s frame. This ensures balance and stability during flight.
Make sure the motor’s wires face an accessible direction. This will ease future adjustments.
Securing The Motor
Use screws or adhesive to attach the motor. Ensure it’s tightly fastened to avoid vibrations. Loose motors can cause operational issues. Check alignment with the helicopter’s rotor. Proper alignment ensures efficient power transfer.
Connecting The Wires
Connect the motor’s wires to the power source. Ensure proper insulation to prevent short circuits. Use color codes to match wires correctly. A wrong connection can damage the motor. Double-check connections before proceeding.
Testing The Motor
Before final assembly, test the motor. Turn on the power source and observe. Listen for any unusual sounds. Adjust if necessary to reduce noise. This ensures the motor runs smoothly.
Adjustments And Final Check
After testing, make any needed adjustments. Tighten screws or recheck connections if needed. Ensure everything is secure and in place. This final check ensures safety and functionality.
Wiring And Electrical Setup
Creating a helicopter for a school project can be exciting. The wiring and electrical setup is a critical part. This step brings your helicopter to life. It ensures the motor and blades function. A well-done setup can enhance performance and reliability.
Understanding The Basic Components
Start by identifying key components. You’ll need a small motor, wires, and a battery. Each part has a specific role. The motor powers the blades. The wires connect the system. The battery provides energy.
Choosing The Right Wires
Choose wires that can handle your motor’s power. Thin wires may overheat. Use thicker wires for safety. Ensure they are flexible enough. This helps in easy installation.
Connecting The Motor
Connect the motor to the wires carefully. Ensure the connections are tight. Loose connections can cause malfunctions. Follow the motor’s manual for guidance. Verify that the motor spins freely.
Battery Placement And Connection
Select a secure spot for the battery. Keep it away from moving parts. Connect the wires from the motor to the battery. Ensure the positive and negative terminals match. Test the setup to confirm the connection works.
Testing And Troubleshooting
Test the electrical setup before final assembly. Switch on the battery and watch the motor. If nothing happens, check the connections. Look for any loose or crossed wires. Make adjustments as needed for proper function.
Safety Considerations
Always prioritize safety during the process. Avoid working with wet hands. Keep the setup away from water. Use insulated tools when handling wires. Ensure the battery is not overcharged.
Testing Flight Capabilities
Crafting a helicopter for a school project involves understanding basic flight mechanics. Focus on lightweight materials to ensure lift. Testing flight capabilities becomes crucial to refine the design and improve performance.
Testing the flight capabilities of your homemade helicopter is not just a critical step; it’s an exciting part of your school project. This is where all your hard work comes to life, and you see your creation soar. But how do you ensure your helicopter flies correctly and safely?
Let’s dive into the essential steps and tips to get your helicopter off the ground successfully.
Prepare For Lift-off
Before testing, make sure your helicopter is ready. Check that all parts are securely attached and there are no loose ends. This is the time to double-check the rotor blades and ensure they’re balanced. Find a spacious, open area free from obstacles.
Safety is paramount, so ensure you have enough room for the helicopter to fly without hitting anything.
Calibrate Your Controls
If your helicopter has remote controls, calibrate them. Test the responsiveness of the controls to ensure they work smoothly. Adjust any settings that might affect the helicopter’s stability.
This step is crucial because precise control can make the difference between a smooth flight and a crash.
Conduct A Controlled Test
Perform a controlled test by initially lifting the helicopter just a few inches off the ground. Observe how it behaves. This helps you gauge if adjustments are necessary before attempting higher flights. If the helicopter wobbles, it might indicate an imbalance.
Make small adjustments to the rotor blades or weight distribution to correct this.
Analyze Flight Performance
After your test flights, take a moment to analyze the performance. Did your helicopter hover steadily? Did it tilt to one side?
This analysis will help you understand what changes are needed. Sometimes, minor tweaks can significantly improve flight stability and duration.
Iterate And Improve
Don’t be discouraged by initial failures. Each attempt gives you valuable insights. Make necessary adjustments and try again.
Remember, successful inventors often learn from trial and error. What will you learn from your helicopter’s flight tests?
Safety Precautions
Always prioritize safety. Keep a safe distance from the helicopter while it’s in flight. Encourage spectators to stand back and avoid crowded areas.
Consider wearing safety goggles to protect your eyes. Have a plan to quickly cut power if something goes wrong.
Celebrate Your Success
Once your helicopter flies successfully, take a moment to celebrate your achievement. Share your experiences with classmates or family members. Reflect on what you learned and how you overcame challenges. What surprised you about the process?
Testing your helicopter’s flight capabilities can be a thrilling experience. By following these steps, you not only ensure a safer and more successful flight, but you also deepen your understanding of the principles of flight. What will your next engineering challenge be?
Troubleshooting Common Issues
Creating a helicopter for a school project can be tricky. Common issues often include balance problems and unstable rotors. Ensure all parts are securely attached and test the rotor’s spin to achieve a successful project.
When you’re working on a helicopter for a school project, you might hit a few bumps along the way. These challenges are not uncommon and can teach you a lot about problem-solving. Let’s dive into some typical issues you might encounter and how to tackle them effectively.
1. Motor Isn’t SpinningIf the motor isn’t spinning, start by checking the power source. Ensure the batteries are fully charged and connected properly. Sometimes, a loose connection can be the culprit. Double-check your wiring; even a small disconnect can halt your project.
2. Blades Aren’t LiftingWhen the blades spin, but the helicopter doesn’t lift, it might be a weight issue. Consider the materials used; perhaps they’re too heavy. You might need to trim some parts or switch to lighter materials. Also, ensure the blades are the right size and balanced correctly.
3. Helicopter Spins Out of ControlAn uncontrolled spin often indicates imbalanced blades. Check that each blade is symmetrical and evenly weighted. Another possibility is incorrect rotor alignment. Adjust the rotor to ensure it’s centered and stable.
4. Electronic Components OverheatingOverheating components can signal a wiring issue. Inspect your connections to ensure nothing is short-circuited. If everything looks correct, consider adding a small fan or heat sink to disperse excess heat.
5. No Response from Remote ControlWhen the remote doesn’t communicate with your helicopter, verify the frequency settings. Ensure the transmitter and receiver are on the same frequency. Also, check the batteries in both the remote and the helicopter.
6. Helicopter Drifts in One DirectionDrifting could be due to misalignment or uneven weight distribution. Adjust the trim settings on your remote control to counteract the drift. Re-evaluate the balance of your helicopter to ensure everything is even.
Working through these issues can be a rewarding experience. Each troubleshooting step enhances your understanding and boosts your problem-solving skills. What challenge will you tackle first?
Frequently Asked Questions
What Materials Do I Need For A School Helicopter Project?
You will need cardboard, scissors, glue, a small motor, and propellers. Consider using paint or markers for decoration. Ensure all materials are lightweight for easy assembly. Gather everything before starting to make the process smoother and more enjoyable.
How Can I Make My Helicopter Fly?
To make it fly, attach a motor and propellers. Secure the motor and ensure proper connections for power. Balance the helicopter carefully to maintain stability during flight. Test it in an open space to avoid damage and ensure it flies smoothly.
What Is The Basic Design For A Helicopter Model?
Begin with a simple frame using cardboard or lightweight materials. Include a rotor and a tail for balance. Keep the design aerodynamic to aid flight. The design should be easy to assemble and understand for a school project.
How Long Does It Take To Make A Helicopter Model?
The project usually takes about 2 to 3 hours. Preparation and gathering materials can take additional time. Be patient and follow each step carefully for the best results. Adjust the time based on complexity and your experience level.
Conclusion
Creating a helicopter for a school project can be fun. It also teaches valuable lessons in engineering and creativity. Follow the steps carefully. Use materials that are easy to find. Make sure to test your helicopter. Adjust as needed for better performance.
Encourage teamwork if working with friends. This project fosters learning and imagination. It’s a great way to explore science. Plus, you’ll gain new skills and knowledge. Enjoy the process and take pride in your creation. Your helicopter will impress your classmates and teachers.