How To Make Easy Jelly Roll Strings Quilt Blocks: Step-by-Step Guide

Imagine turning a pile of colorful fabric strips into a stunning quilt block with minimal effort. That’s exactly what you’ll achieve with jelly roll strings quilt blocks.
If you’re looking for a fun and rewarding sewing project, you’re in the right place. With just a few simple steps, you can create beautiful quilt blocks that will impress anyone who sees them. This guide is designed to make the process easy for you, breaking down each step so you can follow along without feeling overwhelmed.
Whether you’re a seasoned quilter or a beginner eager to dive into the world of quilting, you’ll find this tutorial engaging and straightforward. Get ready to unleash your creativity and add a personal touch to your next quilt project.
Materials Needed
Gather fabric jelly rolls, a sewing machine, and thread to craft quilt blocks. Include scissors, pins, and a ruler for precise cutting. Use a rotary cutter for smooth edges, ensuring neat and tidy quilt pieces.
Creating a stunning Jelly Roll Strings Quilt Block is an exciting journey that begins with gathering the right materials. Whether you’re a seasoned quilter or a beginner, having everything at your fingertips ensures a smooth and creative quilting process. Let’s dive into what you need to get started.
Jelly Roll Strips
Jelly roll strips are essential. These pre-cut fabric strips, typically measuring 2.5 inches wide, come in a variety of colors and patterns. They save you the hassle of cutting and make it easy to create vibrant quilt blocks. Choose a color scheme that speaks to you. Do you prefer bright and bold or subtle and soothing?
Background Fabric
Select a background fabric that complements your jelly roll strips. This fabric will form the base of your quilt blocks. A solid color can highlight your jelly roll patterns beautifully. What shade will make your quilt block pop?
Rotary Cutter And Cutting Mat
Precision is key when cutting your fabrics. A rotary cutter paired with a cutting mat ensures clean and accurate cuts. This tool duo is indispensable in any quilter’s toolkit. Have you experienced the satisfaction of a perfectly cut strip?
Sewing Machine
A reliable sewing machine speeds up the process and provides strong, even stitches. Ensure your machine is in good working condition. A well-functioning machine can transform your quilting experience. How does your sewing machine enhance your creativity?
Thread
Choose a high-quality thread that matches your fabric. Quality thread prevents breakage and ensures lasting durability. Sometimes, a contrasting thread can add an unexpected twist to your design. What thread color will bring your vision to life?
Iron And Ironing Board
Pressing your fabrics is crucial for a neat finish. An iron and ironing board help flatten seams and ensure everything stays in place. This step might seem small, but it makes a big difference in the final look. Have you felt the satisfaction of a perfectly pressed seam?
Quilting Ruler
A quilting ruler aids in measuring and cutting your fabric accurately. It’s especially useful for creating straight edges and ensuring uniformity. This tool is your best friend for maintaining consistency across your quilt blocks. How precise are your measurements with a quilting ruler?
By gathering these materials, you’re setting the stage for a creative quilting adventure. Each piece plays a crucial role in bringing your Jelly Roll Strings Quilt Blocks to life. Ready to get started?
Credit: diyjoy.com
Choosing The Right Fabric
Choosing the right fabric is crucial for creating stunning jelly roll strings quilt blocks. The fabric you select will define the overall appearance and feel of your quilt.
With countless options available, making a choice can seem overwhelming. This guide will help you select jelly roll strips and coordinate colors and patterns effectively.
Selecting Jelly Roll Strips
Jelly roll strips are precut fabric pieces, usually 2.5 inches wide. They simplify the quilting process and offer a variety of designs. Look for high-quality cotton strips for durability. Ensure the fabric is tightly woven to prevent fraying. Consider the theme of your quilt before picking the strips.
Variety is key. Choose strips from different collections to add interest. Mixing solids with prints can create dynamic quilt blocks. Be mindful of the width; consistent sizing will ease assembly. Keep an eye on the length of each strip, ensuring it fits your project requirements.
Coordinating Colors And Patterns
Colors play a vital role in the aesthetic of your quilt. Choose colors that complement each other. Using a color wheel can help in finding harmonious combinations. Balance bright hues with neutral tones for a visually appealing quilt.
Patterns add texture and depth. Select patterns that match the theme you envision. Geometric patterns can offer a modern look, while florals give a classic feel. Avoid overcrowding your quilt with too many patterns. Aim for a cohesive design that flows seamlessly.
Test combinations before sewing. Lay strips side by side to see how they interact. This step ensures that your quilt will have the desired effect. Take your time to find the perfect match.
Preparing Your Workspace
Before diving into the art of creating jelly roll strings quilt blocks, setting up your workspace is key. A well-prepared area boosts creativity and efficiency. It allows you to focus on the task without unnecessary distractions. Let’s explore how to prepare your workspace effectively.
Setting Up Sewing Machine
Position your sewing machine on a stable surface. Ensure it’s at a comfortable height. This prevents strain during long sewing sessions.
Check the machine’s power source. Secure the cord to avoid accidents. Keep a small lamp nearby for better visibility. Good lighting helps you see details clearly.
Organizing Your Tools
Arrange all your sewing tools within arm’s reach. Use a basket or small container for smaller items. Scissors, pins, and thread should be easily accessible.
Consider a magnetic strip for metal tools. This keeps them organized and visible. A small trash bin nearby keeps the area tidy. Less clutter means a clearer mind.
Cutting The Fabric Strips
Creating jelly roll strings quilt blocks starts with cutting fabric strips precisely. Ensure each strip measures 2. 5 inches wide for consistency. Use a rotary cutter and ruler for clean, straight edges.
Cutting the fabric strips for your jelly roll strings quilt blocks is where creativity meets precision. This step is crucial as it sets the foundation for your entire quilt project. Whether you’re a seasoned quilter or a newbie, mastering the art of cutting will make your quilt-making journey smoother and more enjoyable.
Let’s dive into the essentials of measuring and marking, and using a rotary cutter effectively.
Measuring And Marking
Accurate measurements are key to a successful quilt block. Start by laying out your fabric on a clean, flat surface. Use a clear ruler to measure the width and length of your fabric strips. Consistency in size keeps your quilt blocks uniform and visually appealing. Mark the measurements with a fabric marker or chalk.
This ensures the lines are visible without permanent stains on your fabric. Imagine the satisfaction of seeing perfectly aligned quilt blocks come together seamlessly. It all starts with precise measuring and marking.
Using Rotary Cutter
A rotary cutter is your best friend for clean and swift cuts. Hold it firmly, ensuring your grip is comfortable and secure. Place your ruler on the marked line and glide the rotary cutter along the edge. This technique helps you achieve straight, smooth cuts.
Remember to keep your fingers clear of the cutter’s path. Safety is as important as accuracy. Have you ever wondered why your quilt blocks weren’t fitting perfectly?
A sharp rotary cutter might be the missing link to your perfect quilt. By focusing on these cutting techniques, you lay a strong foundation for your jelly roll strings quilt blocks. What challenges do you face when cutting fabric?
Sewing The Strips Together
Sewing strips together can create beautiful jelly roll string quilt blocks. Start by aligning fabric strips neatly. Then, stitch them to form colorful, easy-to-make blocks, perfect for any quilt project.
Creating a beautiful Jelly Roll Strings Quilt Block begins with sewing your strips together. This step is the foundation of your quilt block, where your fabric choices come to life in a harmonious pattern.
It’s essential to approach this part with precision and care to ensure your quilt looks polished and professional. So, roll up your sleeves and let’s dive into the details of aligning and stitching your strips to perfection.
Aligning The Strips
Proper alignment of your fabric strips is crucial. Lay out your strips on a flat surface. Make sure the edges are straight and the patterns align as you envision them.
A misaligned strip can throw off the entire look of your quilt block. Use a ruler or seam guide to keep everything straight. Consider pinning your strips together at regular intervals to keep them in place while you sew. Are you finding it tricky to keep them straight?
Try arranging them in a staggered fashion on your worktable before sewing. This approach can help you visualize the final pattern.
Stitching Techniques
With your strips aligned, the next step is to stitch them together. Use a straight stitch on your sewing machine, which is perfect for quilt making. Keep your stitch length moderate, around 2.5 mm, to ensure durability without puckering.
Feed the strips slowly through the machine, guiding them gently. Avoid pulling or pushing as it can distort the fabric. Have you thought about using a chain piecing method? It’s a time-saver. By continuously feeding one strip after another without stopping the machine, you’ll create a continuous chain of sewn strips, reducing time spent on cutting threads.
Once stitched, press the seams to one side using an iron. This will help your quilt block lay flat and look more professional. Consider pressing the seams toward the darker fabric to prevent them from showing through lighter areas. Sewing strips together can be a meditative process.
Take your time, enjoy the rhythm of your sewing machine, and watch as your quilt block begins to take shape.Remember, precision now leads to a stunning quilt later. Are you ready to see your masterpiece come alive?
Pressing The Seams
Crafting easy jelly roll string quilt blocks begins with pressing the seams. This technique ensures smooth, flat blocks, making your quilt assembly a breeze. Keep your seams tidy for a polished finish that enhances the quilt’s overall appeal.
Pressing the seams is an essential step in creating a beautifully finished jelly roll strings quilt block. It can make a significant difference in the appearance and durability of your quilt. By taking care to press your seams correctly, you ensure that your quilt blocks align perfectly, which makes the final assembly of your quilt much easier and more satisfying.
Using An Iron
An iron is your best friend when pressing quilt seams. Set your iron to the cotton setting for most jelly roll fabrics. Always test a small fabric piece to avoid any damage. Press the seam by placing the iron on it without moving it back and forth. This avoids stretching the fabric.
Simply lift the iron and press down again along the seam. Does pressing sound tedious? Consider it a meditative part of the quilting process. Each seam you press brings you one step closer to a flawless quilt block.
Avoiding Wrinkles
Wrinkles can be frustrating in quilt blocks, but they are easy to prevent. Always press your seams to one side instead of open. This helps the fabric lay flat and minimizes wrinkles. If you notice wrinkles, use a bit of steam from your iron. Lightly hover over the fabric to relax the fibers without soaking them. Ever found yourself re-pressing the same seam over and over?
It could be your pressing technique. Gentle, intentional movements with your iron are more effective than aggressive ones. Remember, the way you press your seams can impact the look of your finished quilt. Taking a little extra time on this step pays off in the end. Wouldn’t you agree that a perfectly pressed seam is worth the effort?
Trimming The Blocks
Creating jelly roll strings quilt blocks is simple and fun. Trim the blocks for a polished finish. Enjoy a colorful quilt with minimal effort.
Trimming the blocks is a pivotal step in making jelly roll strings quilt blocks. It ensures that your quilt maintains a neat and professional appearance. You might feel tempted to skip this step to save time, but precise trimming is crucial for uniformity and overall design quality.
Imagine spending hours sewing beautiful blocks, only to have uneven edges disrupt the final pattern. The satisfaction of seeing perfectly aligned blocks fit together seamlessly is worth the extra effort.
Squaring Up The Edges
Begin by placing your quilt block on a cutting mat. Ensure it’s lying flat without any wrinkles or folds. A rotary cutter paired with a quilting ruler will be your best friends here. Align the ruler with the edges of your block. Trim away any excess fabric that extends beyond the ruler’s edge.
You want your block to form a perfect square or rectangle, depending on your design. Take a moment to admire the clean lines of your newly squared block. It’s like giving your quilt a fresh haircut.
A well-trimmed block lays the foundation for a quilt that pieces together effortlessly. Have you ever noticed how a small adjustment can make a significant difference?
Ensuring Uniform Size
Achieving uniform size across all your blocks is essential. Measure each block after trimming to confirm its dimensions match your pattern’s requirements. Consistency is key, and it’s this attention to detail that separates a good quilt from a great one.
Consider using templates or guides if you struggle with maintaining the same size. These tools can help you trim blocks to the exact measurements needed. If one block is slightly off, it can throw off the alignment of the entire quilt. Don’t hesitate to re-trim if necessary.
It’s better to catch discrepancies now than later. Have you ever wondered how a single block can affect the harmony of your entire quilt? Ensuring each piece is cut to perfection guarantees a cohesive and beautiful final product.

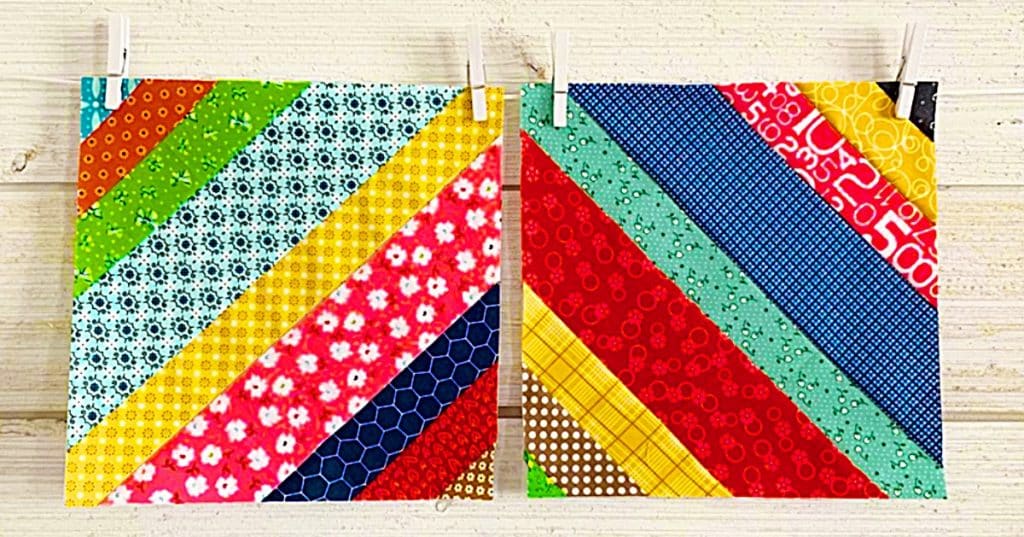
Credit: www.patchworkposse.com
Assembling The Quilt Top
Creating quilt blocks with jelly roll strings is simple. Arrange strips in desired pattern. Sew together carefully. Each block forms part of a beautiful quilt top. Enjoy the colorful designs and ease of assembly. Perfect for beginners and seasoned quilters alike.
Assembling the quilt top is an exciting stage in your quilting journey. At this point, the vibrant jelly roll string blocks come together. They form a beautiful, cohesive pattern. The process is straightforward and rewarding. It transforms individual blocks into a stunning quilt top. Let’s explore how to piece these blocks together.
Arranging The Blocks
First, lay out your quilt blocks on a flat surface. Ensure you have good lighting. Start by arranging blocks in a pleasing pattern. Consider color balance and contrast.
This step allows you to visualize the final design. Shuffle the blocks until you are satisfied. Take a photo for reference. It helps in maintaining the layout while sewing.
Joining The Rows
Begin by sewing blocks into rows. Align each block carefully. Use a quarter-inch seam allowance. Pin the edges to keep them aligned. Sew slowly and steadily. Press the seams open or to one side. It reduces bulk and gives a neat finish. Once the rows are ready, join them together.
Match the seams carefully at each intersection. Sew with precision to create a smooth quilt top. Press the entire top for a crisp look. Now your quilt top is ready for batting and backing.
Adding Borders
Borders add structure and charm to jelly roll strings quilt blocks. They frame the design beautifully. Simple to sew, borders enhance your quilt’s overall appearance.
Adding borders to your jelly roll strings quilt blocks can elevate your quilt design. Borders frame your blocks, adding visual appeal and a polished finish. They also provide extra size and dimension to your quilt. Consider your design and color scheme when selecting borders.
Choosing Border Fabric
Select fabric that complements your quilt blocks. Consider the colors and patterns in your jelly roll strings. A contrasting border can make your blocks stand out. Match the border fabric with your quilt’s theme. Choose durable fabric to withstand use and washing. Test the fabric next to your quilt before deciding.
Attaching Borders
Measure your quilt’s sides accurately before cutting border fabric. Cut the fabric strips slightly longer than your quilt’s edges. Pin the fabric strips to your quilt’s edges for stability.
Sew the borders onto the quilt using a straight stitch. Start with the sides, then attach the top and bottom borders. Trim any excess fabric for a neat finish. Press the seams to set the borders in place.
Quilting Techniques
Create beautiful jelly roll strings quilt blocks with ease. Use pre-cut fabric strips for a quick assembly. Enjoy the process as you sew vibrant patterns together.
Creating a jelly roll strings quilt block can be an enjoyable and fulfilling project. Whether you’re new to quilting or a seasoned pro, understanding quilting techniques will enhance your experience. This guide will help you craft beautiful quilt blocks efficiently and effectively.
Types Of Quilting Patterns
When making a jelly roll strings quilt, the pattern you choose can significantly influence the final look. Some popular patterns include the Log Cabin, Rail Fence, and Basket Weave. Each offers a unique aesthetic that can transform your quilt into a work of art.
Consider the Log Cabin pattern for its simplicity and classic appeal. It uses strips of fabric to create a square, with each round of strips building outward. This pattern is excellent for showcasing a variety of colors and prints from your jelly roll. The Rail Fence pattern is another simple yet striking option.
It involves sewing together strips of equal width to create a block that resembles a rail fence. This is a perfect choice if you want to play with color contrasts.
Hand Vs. Machine Quilting
Deciding whether to quilt by hand or machine is crucial. Hand quilting allows you to add a personal touch, with each stitch reflecting your effort. It’s a slower process but can be meditative and rewarding. Machine quilting, on the other hand, offers speed and precision.
It’s ideal for larger projects or when you’re working with complex designs. A sewing machine with a quilting foot can help you create consistent stitches and patterns more efficiently. Ask yourself what you enjoy most about quilting. Is it the soothing rhythm of hand stitches, or the quick satisfaction of machine quilting?
Both methods have their merits, and your choice can affect both your experience and the quilt’s finish. Incorporating different quilting techniques can elevate your jelly roll strings quilt blocks from simple to stunning. Which technique will you try first?
Binding The Quilt
Binding the quilt is the final touch in your quilting journey. It frames the quilt, adding a polished look. This step requires patience, but the results are rewarding. Let’s explore how to prepare and sew the binding for your jelly roll strings quilt blocks.
Preparing The Binding
Start by choosing fabric for the binding. Opt for a color that complements the quilt. Measure the perimeter of the quilt to determine binding length. Cut strips of fabric about 2.5 inches wide. Join the strips end to end with diagonal seams. Press the seams open for a smooth finish.
Fold the joined strip in half lengthwise. Press it to create a crease. This makes the binding easier to handle. Gather all the materials, including pins and a sewing machine. You’re ready to sew the binding onto the quilt.
Sewing The Binding
Pin the binding to the quilt’s edge. Start sewing from one corner. Use a quarter-inch seam allowance. Sew slowly to maintain accuracy. As you reach corners, create mitered edges. Fold the binding at a 45-degree angle. Continue sewing along the next side.
Once sewn, fold the binding over the quilt’s edge. Hand-stitch or machine-stitch to secure it. Ensure the stitches are even and neat. This keeps the binding firm and tidy. Your quilt now has a stunning border. Enjoy the beauty of your finished quilt.
Final Touches
Create vibrant quilt blocks effortlessly with jelly roll strings. Arrange strips, sew them together, and trim to size. These easy steps add beautiful touches to any quilting project.
Creating a quilt is like piecing together a masterpiece, and the ‘Final Touches’ are where your vision truly comes to life. This step is not just about finishing your quilt; it’s about ensuring every detail shines.
You’ve spent hours crafting each block, and now it’s time to give your quilt the attention it deserves before it graces a bed or wall. These last steps are crucial to ensuring your creation is both beautiful and durable.
Inspecting For Flaws
Before you celebrate your completed quilt, give it a thorough inspection. Look closely at seams and edges. Are they secure and even? Consider using a magnifying glass if needed.
A small flaw today could become a big issue tomorrow. Catching these imperfections early saves you from future headaches. Sometimes, it helps to ask a friend to take a look. Fresh eyes can spot things you’ve missed.
Have you ever found a stray thread or a misplaced stitch after thinking you were done? It happens to the best of us.
Washing And Storing
Once your quilt passes inspection, it’s time for a gentle wash. Use mild detergent and cold water. This helps set the colors and remove any dust or oils from your hands. Lay your quilt flat to dry to maintain its shape. Hanging might stretch it unevenly. How do you plan to store your quilt?
Think about using a breathable cotton bag. It keeps the quilt clean and protects it from dust and light. Store it in a cool, dry place to avoid moisture buildup. Remember, your quilt is not just a project; it’s a piece of art that deserves care.
By addressing these final touches, you ensure your quilt stays vibrant and strong, ready to be admired for years to come. Is there a special place where you picture your quilt displayed?

Credit: www.hearthsidecomforts.com
Frequently Asked Questions
What Are Jelly Roll Strings In Quilting?
Jelly roll strings are pre-cut fabric strips typically measuring 2. 5 inches wide. They are rolled together for easy storage and use in quilting projects. These strips are versatile and save time, making them popular among quilters for creating colorful quilt blocks quickly.
How Do You Start A Jelly Roll Quilt Block?
Begin by selecting your jelly roll strips and arranging them in a desired pattern. Sew the strips together, aligning edges carefully. Press the seams flat for a smooth finish. Repeat this process to create additional blocks, ensuring consistency in size and design.
Can Beginners Make Jelly Roll Quilt Blocks?
Yes, jelly roll quilt blocks are beginner-friendly due to their simplicity and pre-cut nature. The uniform size of the strips reduces cutting errors, making it easier for novices to assemble blocks. Following basic sewing techniques and patterns helps beginners successfully complete these quilt projects.
What Tools Are Needed For Jelly Roll Quilting?
Essential tools include a sewing machine, rotary cutter, cutting mat, and ruler. Use an iron to press seams. These tools help you measure, cut, and sew accurately, ensuring your quilt blocks are neat and well-constructed. Good tools enhance efficiency and precision in quilting.
Conclusion
Creating jelly roll strings quilt blocks is fun and rewarding. These blocks add charm to any quilt project. With simple steps, beginners can succeed. Enjoy the creative process and play with colors. Quilting offers relaxation and a sense of achievement.
Share your beautiful creations with friends and family. This craft brings warmth and connection. Remember, practice improves your skills over time. Dive into this delightful quilting adventure and watch your skills grow. Happy quilting!